In today’s interconnected world, ensuring reliable and resilient connectivity is crucial for businesses. One way to achieve this is through BGP multihoming, which allows organizations to connect to multiple ISPs for redundancy and load balancing.
In this article, we will explore how to configure Cisco BGP multihoming with two different ISPs, as well as the benefits, challenges, and best practices of BGP multihoming. We’ll also include Cisco configurations and verification commands to help you follow along.
Before we dive in, make sure you have read through my previous BGP posts.
- What is BGP in Networking
- BGP Message Types
- BGP States
- How to advertise routes in BGP – 5 Simple Techniques
- eBGP vs iBGP
- What is BGP Regular Expression
- BGP Security Best Practices
- Common BGP Misconfigurations and Ways to Fix Them
Let’s get started.
What is BGP Multihoming?
Multi-homing is the practice of connecting a network to multiple internet service providers (ISPs) to improve its reliability, availability, and performance. The system is designed to ensure that if one provider’s network goes down, the other takes over, ensuring that network traffic continues to flow without interruption.
Benefits of Multi-homing
- Improved Network Reliability: Multi-homing can improve network reliability by providing redundancy and failover capabilities. If one link fails, traffic can automatically switch to the backup link, ensuring continuous service availability.
- Load Balancing: Multi-homing can distribute traffic across multiple links to optimize bandwidth utilization and reduce congestion on any one link. This can lead to improved network performance, faster downloads, and reduced latency.
- Cost Optimization: Multi-homing can provide cost optimization by leveraging multiple ISP links to negotiate better pricing and reduce the overall cost of internet connectivity.
- Service Level Agreements (SLAs): Multi-homing can improve SLAs by leveraging multiple ISP links and negotiating higher service levels with each provider. This can ensure that the network meets the organization’s performance and availability requirements.
Types of BGP Multihoming?
There are many options to do multihoming or bgp load balancing with two ISPs; mainly, two types of multihoming are used in today’s world.
- Single Customer Router connected to two different ISP Routers.
- Two Customer Routers connected to two different ISP Routers
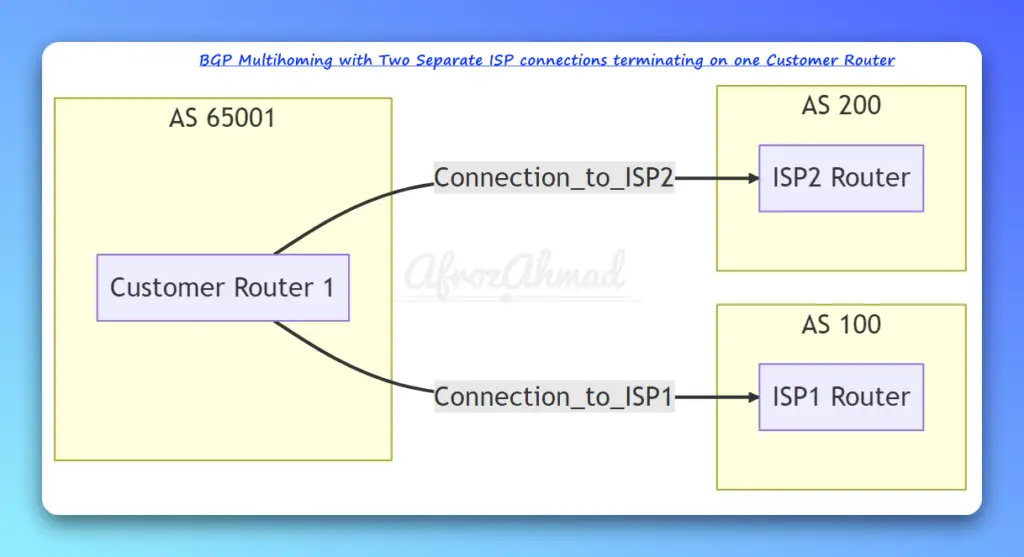
Scenario 1- BGP Multihoming with Two Separate ISP connections terminating on one Customer Router
In this BGP multihoming scenario, we have a single customer router connected to two different ISPs. The objective is to provide redundancy and the ability to use both ISPs for load-balancing purposes.

In the above diagram, we have one customer router (CR1) in Autonomous System 65001 connected to ISP1 Router in AS 100 and ISP2 Router in AS 200.
Configuration
Now, let’s go through the Cisco configuration for the customer router in this scenario.
- Define the BGP process and your AS number:
router bgp 65001- Configure the BGP neighbors for the two ISPs:
neighbor 192.0.2.1 remote-as 100
neighbor 192.0.2.1 description ISP-1
neighbor 198.51.100.1 remote-as 200
neighbor 198.51.100.1 description ISP-2- Advertise your network to both ISPs:
network 203.0.113.0 mask 255.255.255.0- Configure BGP attributes to control the inbound and outbound traffic:
For example, you can use AS-path prepending to make one ISP connection less preferred for inbound traffic:
route-map ISP1-prepend permit 10
set as-path prepend 65001 65001 65001
!
route-map ISP1-prepend permit 20
!
router bgp 65001
neighbor 192.0.2.1 route-map ISP1-prepend out
In the above configuration, we are prepending AS 65001 three times to make the path less preferred through ISP1 for inbound traffic. Traffic will primarily use ISP2 to reach your network, but ISP1 will still be utilized in case of ISP2 failure.
Verification
To verify the BGP configuration, you can use the following commands:
- Check the BGP summary:
show ip bgp summary- View the BGP routing table:
show ip bgp- Examine the IP routing table:
show ip route- Inspect BGP neighbors’ information:
show ip bgp neighborsBy following these configuration steps and understanding the diagram, you can efficiently implement BGP multihoming with a single customer router connected to two different ISPs. This setup provides redundancy and allows you to utilize both ISPs for traffic engineering and load-balancing purposes.
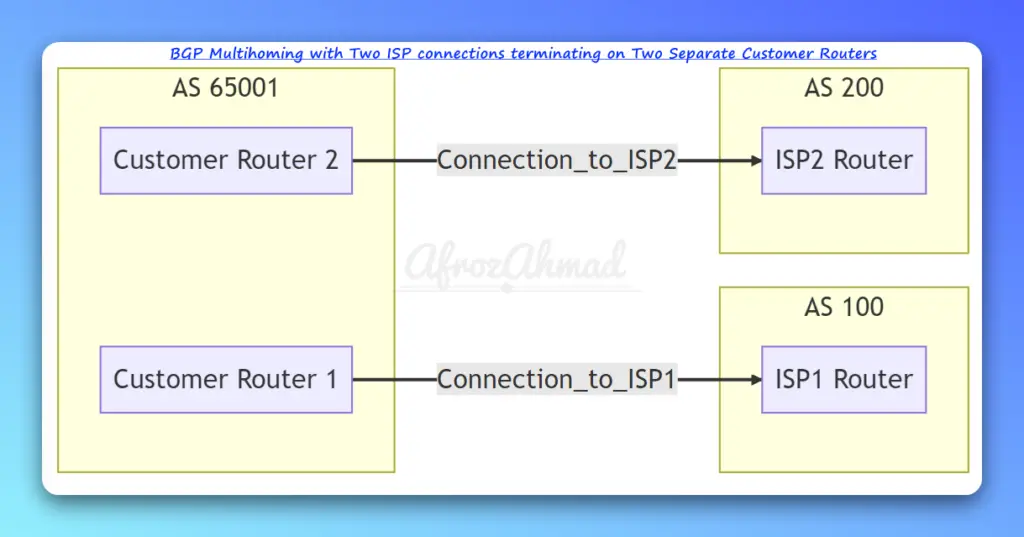
Scenario 2- BGP Multihoming with Two ISP connections terminating on Two Separate Customer Routers
In this BGP multihoming scenario, we have two customer routers connected to two different ISPs. The objective is to provide redundancy and the ability to use both ISPs for load-balancing purposes.

In the above diagram, we have two customer routers (CR1 and CR2) in Autonomous System 65001 connected to ISP1 Router in AS 100 and ISP2 Router in AS 200, respectively.
Configuration
Now, let’s go through the Cisco configuration for the customer routers in this scenario.
Customer Router 1 Configuration
- Define the BGP process and your AS number:
router bgp 65001- Configure the BGP neighbor for ISP1:
neighbor 192.0.2.1 remote-as 100
neighbor 192.0.2.1 description ISP-1- Advertise your network to ISP1:
network 203.0.113.0 mask 255.255.255.0Customer Router 2 Configuration
- Define the BGP process and your AS number:
router bgp 65001- Configure the BGP neighbor for ISP2:
 neighbor 198.51.100.1 remote-as 200
neighbor 198.51.100.1 description ISP-2- Advertise your network to ISP2:
network 203.0.113.0 mask 255.255.255.0BGP Attributes for Inbound and Outbound Traffic Control
You can use BGP attributes to control the inbound and outbound traffic. For example, you can use AS-path prepending to make one ISP connection less preferred for inbound traffic:
On Customer Router 1 (ISP1 connection):
 route-map ISP1-prepend permit 10
 set as-path prepend 65001 65001 65001
!
route-map ISP1-prepend permit 20
!
router bgp 65001
 neighbor 192.0.2.1 route-map ISP1-prepend out
In the above configuration, we are prepending AS 65001 three times to make the path less preferred through ISP1 for inbound traffic. Traffic will primarily use ISP2 to reach your network, but ISP1 will still be utilized in case of ISP2 failure.
On Customer Router 1 (ISP1 connection):
Or You can use higher Local Preference to prefer ISP1 for outbound traffic:-
- Set local preference for outbound traffic:
ip community-list 1 permit 100:100
route-map ISP1-OUT permit 10
 match community 1
 set local-preference 200
!
router bgp 65001
 neighbor 192.0.2.1 route-map ISP1-OUT in
In the above configuration, we’re setting a higher local preference (200) for routes learned from ISP1. This will make outbound traffic prefer ISP1.
And in the below config on Customer Router2, we are setting lower Local Preference (100) so that ISP1 will be preferred for outbound traffic.
On Customer Router 2 (ISP2 connection):
- Set local preference for outbound traffic:
ip community-list 2 permit 200:200
route-map ISP2-OUT permit 10
 match community 2
 set local-preference 100
!
router bgp 65001
 neighbor 198.51.100.1 route-map ISP2-OUT in
In this configuration, we’re setting a lower local preference (100) for routes learned from ISP2. This will make outbound traffic use ISP2 as a backup path.
Verification
To verify the BGP configuration, you can use the following commands on both customer routers:
- Check the BGP summary:
show ip bgp summary- View the BGP routing table:
show ip bgp- Examine the IP routing table:
show ip route- Inspect BGP neighbors’ information:
show ip bgp neighbors- View BGP paths and attributes:
show ip bgp paths- Check BGP community strings:
show ip bgp community- Verify BGP route maps and policies:
show route-mapThis BGP Multihoming setup provides redundancy and allows you to utilize both ISPs for traffic engineering and load-balancing purposes.
You can further improve traffic control by using more BGP attributes, such as AS-Path with Regex, local preference, MED (Multi-Exit Discriminator), and community strings. These attributes can help you manage incoming and outgoing traffic more effectively and achieve optimal routing between your autonomous system and the ISPs.
Challenges of Multi-homing
- Complexity: Multi-homing can be complex to implement and manage, requiring specialized skills and knowledge of network routing protocols and policies.
- Cost: Multi-homing can also be expensive to implement, requiring additional hardware, software, and maintenance costs.
- Traffic Engineering: Multi-homing requires traffic engineering to ensure that traffic is distributed across the links in a balanced and optimized manner. This can be challenging to implement and maintain, particularly in dynamic network environments.
- Security: Multi-homing can introduce additional security risks, such as route hijacking, spoofing, and denial-of-service attacks. These risks can be mitigated through the use of routing protocols, such as Border Gateway Protocol (BGP) and firewalls.
Best Practices for Multi-homing
To ensure a successful multi-homing implementation, organizations should follow these best practices:
- Define clear network requirements and goals.
- Select reliable and diverse ISPs with strong SLAs and performance metrics.
- Implement redundancy and failover mechanisms to ensure continuous service availability.
- Use traffic engineering to balance and optimize traffic across links.
- Monitor network performance and availability to detect and troubleshoot issues.
Conclusion
Multi-homing is a powerful technique for improving network reliability, performance, and availability. While it comes with its own set of challenges, it can provide significant benefits when implemented correctly. By following best practices and leveraging the right tools and technologies, organizations can realize the full potential of multi-homing and achieve their connectivity goals.
- Telecom Network Infrastructure: Complete Guide to Components & Design - January 6, 2026
- TP-Link TL-SG108E vs Netgear GS308E: Budget Smart Switches - January 5, 2026
- MikroTik CRS305-1G-4S+ Review: The Ultimate Budget SFP+ Switch Guide - December 25, 2025


