Setting up high-speed internet doesn’t have to be a hassle. This guide provides straightforward steps for a Self-Install CenturyLink internet service on both DSL and fiber. We’ll cover everything from unboxing to going online, including the My CenturyLink app/QuickConnect activation flow, so you can enjoy your new connection without waiting for a technician when self-install is available.
Keep reading for a quick checklist, DSL vs. fiber notes, and detailed instructions to complete the process efficiently.
See also: Top 15 Best Modem Router Combos for CenturyLink
Equipment You’ll Need for Self-Install CenturyLink Internet
To install your new CenturyLink internet service yourself, you’ll need a self-install kit. This can include:
-
CenturyLink modem/router combo – This all-in-one unit connects you to the CenturyLink network and broadcasts a wireless signal in your home.
-
Ethernet cable – To connect your computer directly to the modem during setup.
-
DSL or phone cable- Plugs from your wall jack to the modem’s DSL port.
-
DSL filters- If you have CenturyLink home phone service too, these filter out the internet signal.
-
Power cable- To power up your modem.
You’ll receive this networking equipment automatically if you order CenturyLink internet service online and select the self-installation option. If you also have home phone service, install DSL filters/splitters on all phone lines except the modem line. Filters are not included in the modem kit and are sent with voice orders.
If ordering by phone, explicitly request the self-install kit. Installation fees vary by technology and market: Standard install up to $25; Technician install up to $149. Some fiber promotions include free installation—check your order summary.
Alternative Option: Use Your Own Modem
You can skip the modem rental fee by purchasing your own compatible unit separately. For DSL, ensure support for PPPoE and VLAN tagging 201. Quantum Fiber typically uses DHCP on the WAN; in some areas VLAN tagging may be required. Always verify on CenturyLink’s approved/compatibility pages before purchasing.
Be aware – If using your own modem or router, support from CenturyLink may be limited for third-party equipment.
See also: How to Fix CenturyLink Slow Internet Speeds: 16 Practical Tips
Finding Your Wall Jack & Getting Set Up
Before connecting everything, identify your service type. For DSL, connect the modem to a telephone (RJ11) wall jack. For fiber, the SmartNID/ONT connects to your router or WiFi system via Ethernet.
Your wall jack will look similar to this for DSL:

The ideal placement for your modem or router is around 3 feet off the ground in a central area of your home.
Avoid setting up in a corner, too high up, or hidden inside a closet to ensure the best WiFi coverage.
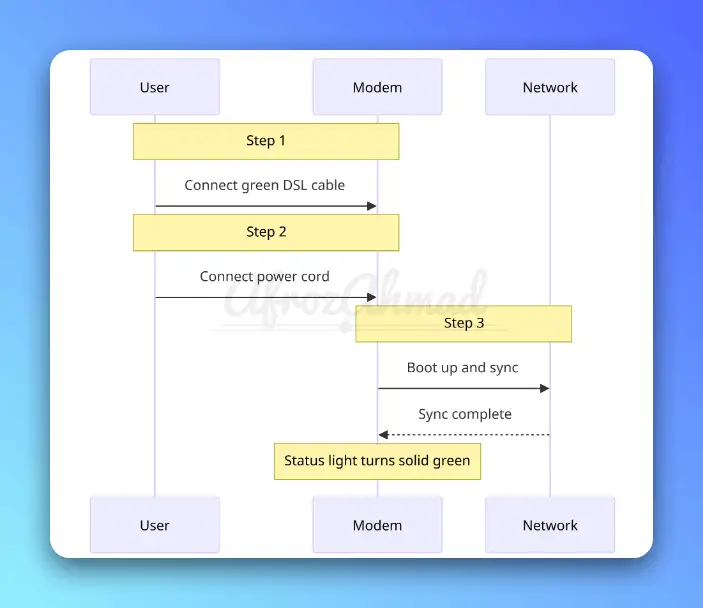
Step-by-Step Modem Connection Connecting the Hardware
Once you’ve selected the ideal modem location near your wall jack, it’s time to plug everything in. The steps below apply to DSL modem/gateways. For fiber, connect an Ethernet cable from the SmartNID/ONT to your router or WiFi gateway, then power on your equipment.
-
Step 1)Connect the green DSL phone cable between your wall jack and the DSL port on your CenturyLink modem.
-
Step 2)Connect the power cord from an outlet to your modem’s power port.
-
Step 3)Wait about 10–15 minutes for the modem to boot, update, and sync with the CenturyLink network. The status light on your device will indicate when setup is complete by turning solid green.
💡 Pro Tip: If you also have CenturyLink home phone service bundled, there are a few extra hardware connections needed. We’ll cover that next.
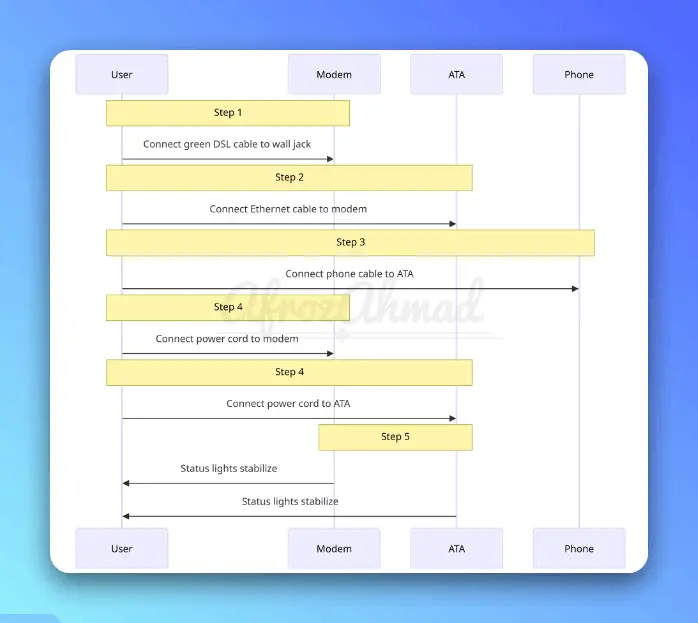
Setting Up CenturyLink Phone + Internet
If you opted for a bundled CenturyLink phone AND internet, you may have additional hardware such as an analog telephone adapter (ATA) for Connected Voice service. Remember to place DSL filters on all phone jacks except the one feeding the modem.
Here are the full steps to hook up a bundle:
-
Step 1) Connect the green DSL phone cable between your wall jack and the DSL port on your CenturyLink modem.
-
Step 2) Use an Ethernet cable to connect from your modem’s Ethernet port to the Ethernet port on the separate analog telephone adapter (ATA) box.
-
Step 3) Connect a standard phone cable from your landline handset into the phone port on the ATA.
-
Step 4) Connect power cords to both the modem and ATA.
-
Step 5) Wait for all status lights on both devices to stabilize, indicating connectivity.
Once the hardware lights confirm everything is correctly installed, it’s time to move on to…
Activating Your CenturyLink Modem
The modem activation process authorizes your device on the CenturyLink network. Service is typically active by 7 p.m. on your scheduled start date—wait until then, connect your hardware, allow ~15 minutes for updates, and then complete activation.
You’ll need to have your new CenturyLink account information handy, including:
- Account Number
- Billing Zip Code
- Default Admin Password (Found printed on your modem’s packaging or label)
There are two ways to activate it:
Activate Using the My CenturyLink App
-
Step 1) Download the My CenturyLink app on your smartphone or tablet.
-
Step 2) Open the app, choose “Install My New Modem” or “Activate New Modem,” and scan the barcode located on your modem.
-
Step 3) Review and accept CenturyLink’s terms and subscriber agreement.
-
Step 4) Monitor the modem checking and activation progress. Don’t close the app!
Once complete, your CenturyLink modem or router will be ready for WiFi setup.
Activate Through QuickConnect Website
Instead of the mobile app, you can also activate by visiting http://connect.centurylink.com on a laptop or computer connected directly to your modem.
The process involves entering your account details, reviewing terms, and monitoring the modem configuration.
💡 “Connected” vs “Unconnected” Modems
If activating an ISP-rented gateway, use the app or website tools CenturyLink provides. For your own personal equipment without CenturyLink software pre-installed, you’ll need to call for assistance retrieving the correct network settings to enter manually. For DSL, those often include PPPoE credentials and VLAN 201; Quantum Fiber typically uses DHCP on the WAN.
Setting Up Your Home WiFi Network
Your CenturyLink modem/router gateway features a built-in wireless access point to broadcast WiFi throughout your home. For fiber with a SmartNID/ONT, connect your own router or CenturyLink WiFi system to the SmartNID via Ethernet.
Let’s get your private home network up and running!
Connecting to Default CenturyLink WiFi Network
The default SSID network name and WiFi password for accessing your modem’s wireless signal are printed on a label on the device itself.
You can stick with these out-of-box WiFi details from CenturyLink to connect right away.
OR for better security…
Customizing Your CenturyLink WiFi Network
I recommend changing your WiFi network name (SSID) and password to something unique for improved home network privacy:
-
Step 1) Locate your gateway’s WiFi settings portal IP address on its rear label, e.g., http://192.168.0.1
-
Step 2)Visit that IP address on a hardwired computer or device, and login with admin credentials.
-
Step 3)Under Wireless Settings, edit your SSID network name u0026amp; WiFi password, then save changes.
After setting your SSID, take a minute to harden security: change the admin password, enable WPA3 (or WPA2‑AES if WPA3 isn’t available), disable WPS if you don’t use it, and turn on a guest network for visitors.
Connecting Your Devices to WiFi
The final step is wirelessly connecting all your equipment like smartphones, laptops, tablets, smart home gadgets, and more to your shiny new home WiFi.
Here’s how to connect any device:
-
Step 1)Open your computer, mobile phone, or tablet’s network settings where available WiFi networks are scanned and listed.
-
Step 2)Select the name of your 2.4GHz or 5GHz CenturyLink wireless network.
-
Step 3)Enter the WiFi password when prompted, and connect!
Once connected, open a web browser or app to test internet connectivity. You should now be surfing the web over your own speedy home internet!
Be sure to repeat steps on all devices you want to connect wirelessly in your home. Also consider writing down your network name and password somewhere accessible in case you need to refer back later.
If anyone needs access like house guests, you can share these WiFi details so they can get online without bothering you.
Testing & Troubleshooting Your Connection
Run a broadband internet speed test to verify everything is working properly with optimal performance.
We recommend using a site like Fast.com or Speedtest.net to test.
Your speeds should match what’s listed for the CenturyLink plan you signed up for. On DSL, speeds vary by line quality and location. On fiber (including Quantum Fiber), available tiers may include 500 Mbps, 940 Mbps/1 Gbps, 3 Gbps, and 8 Gbps where available.
Here are some tips for resolving common connectivity problems with your CenturyLink self-installation:
-
Reboot your modem and router by unplugging the power cables for 60 seconds to reset everything.
-
Double check all hardware connections are fully plugged in properly between the wall, modem, router, and other devices.
-
Make sure your modem and router status lights display solid colors, indicating successful sync with the CenturyLink network. For fiber, also confirm the SmartNID/ONT lights show an active Ethernet link to your router.
-
Ensure you entered the correct wireless network name (SSID) and password to connect your device to WiFi.
-
Try moving your CenturyLink modem to another nearby location and retest for faster WiFi speeds in case the initial spot had interference.
You can also contact CenturyLink technical support online or by phone for personalized troubleshooting assistance.
If speeds remain unusably slow or connectivity dropouts persist, a professional technician visit might ultimately be needed to inspect wiring problems or other issues.
Conclusion
We hope this guide covered everything required to DIY set up your new CenturyLink high speed internet service. Thanks for choosing our site as your resource for planning your self-guided modem and WiFi installation! Let us know in the comments if you have any other questions.
FAQs: Self-Installing CenturyLink Internet
Here are answers to some commonly asked questions about DIY installing your CenturyLink high-speed internet:
Do I need a landline for CenturyLink internet?
No active phone service is required. For DSL, your home needs existing telephone wiring and an RJ11 jack, but you don’t have to subscribe to landline voice service.
Fiber does not use phone jacks; it uses a SmartNID/ONT with Ethernet to your router. Always check local availability and requirements during ordering.
This flexibility lets you choose internet‑only plans if that’s all you need.
Can I replace CenturyLink modem with my own?
You can use your own CenturyLink compatible modem router combo as long as it meets the technical requirements. For DSL, most setups use PPPoE and require VLAN tagging 201. Quantum Fiber commonly uses DHCP on the WAN; some markets also require VLAN tagging.
It’s crucial to ensure the modem/router you choose is not from a cable internet provider, as those are not compatible with CenturyLink.
If you’re integrating your own router with a CenturyLink modem, you can often put the modem in bridge mode. For third‑party gear, CenturyLink support may be limited.
Do I need professional installation or can I self-install CenturyLink?
Yes, self‑installation is possible when your location qualifies and the equipment activates successfully—especially for DSL or when a fiber SmartNID is already installed. New fiber installs typically require a technician to install the SmartNID/ONT.
What internet plans can I self-install?
DSL is commonly self‑installed. Fiber plans usually need a technician to install a SmartNID/ONT; if one already exists at your address, you can self‑install your WiFi gateway or router. Fiber tiers may include 500 Mbps, 940 Mbps/1 Gbps, 3 Gbps, and 8 Gbps where available.
How long does it take to set up CenturyLink?
After your service start date (typically active by 7 p.m.), most users complete modem/router setup and activation in about 30–45 minutes. Tech‑savvy users may finish in 15–20 minutes.
What does a CenturyLink technician do for installation?
For professional installs, a technician handles outside wiring, any needed inside wiring or jacks, places/activates equipment (including SmartNID for fiber), and verifies connectivity. Technician installation fees are up to $149; standard install (outside work only) is up to $25, and promotions may waive certain charges.
Can I use my own modem with CenturyLink instead of renting?
Yes. CenturyLink allows customers to use their own approved equipment. Verify compatibility first—DSL typically needs PPPoE and VLAN 201; Quantum Fiber typically uses DHCP and connects via the SmartNID. Using your own gear can help you avoid rental fees.
Is there a CenturyLink self-installation fee?
A self‑install option is available in many areas; a standard install fee (up to $25) may apply. Promotions can sometimes waive installation or equipment charges—confirm during checkout.
Does CenturyLink provide a modem or a router?
Yes, CenturyLink provides an all‑in‑one gateway for DSL that functions as a modem and a router. For fiber, a technician installs a SmartNID (ONT) that connects to your router or WiFi pods; the SmartNID is provider‑owned and does not provide WiFi on its own.
Customers can lease a gateway from CenturyLink or use compatible third‑party equipment if it meets the technical requirements.
For those interested in using their own router or modem/router combo device, ensure compatibility with your service type, particularly for fiber connections that use a SmartNID instead of a traditional modem.
Is the CenturyLink modem also a router?
Yes, CenturyLink DSL gateways are modem‑router combo devices that provide WiFi access. Fiber uses a SmartNID plus a separate router/WiFi system.
Does CenturyLink internet include WiFi?
Yes, CenturyLink modem/router combos for DSL include WiFi. With fiber, WiFi is delivered by your router or CenturyLink’s WiFi system connected to the SmartNID.
- pfSense 10G Home Lab Setup: Complete Hardware Guide (2026) - April 1, 2026
- Best Budget Home Lab Setup Under $300 (2026): Complete Starter Stack - March 30, 2026
- Best Modems for Spectrum: Top DOCSIS 3.1 Picks That Actually Work - March 28, 2026