This lab has been completed on Nexus 7010 with the following hardware and software installed; you can take a look at Cisco Nexus 7000 user accounts and RBAC in my previous post.
In this task, we will configure ACLs using the atomic programming feature of Cisco NX-OS.
Software. In addition, we will investigate the method used to modify, validate, and re-sequence ACLs.
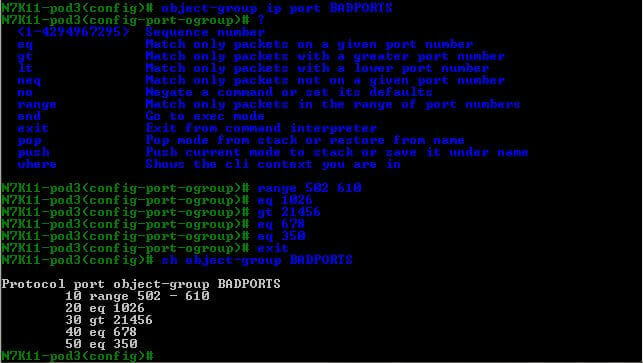
- Step 1 – On your N7K switch, create two object groups: ALLOWSUBNETS and the other BADPORTS.

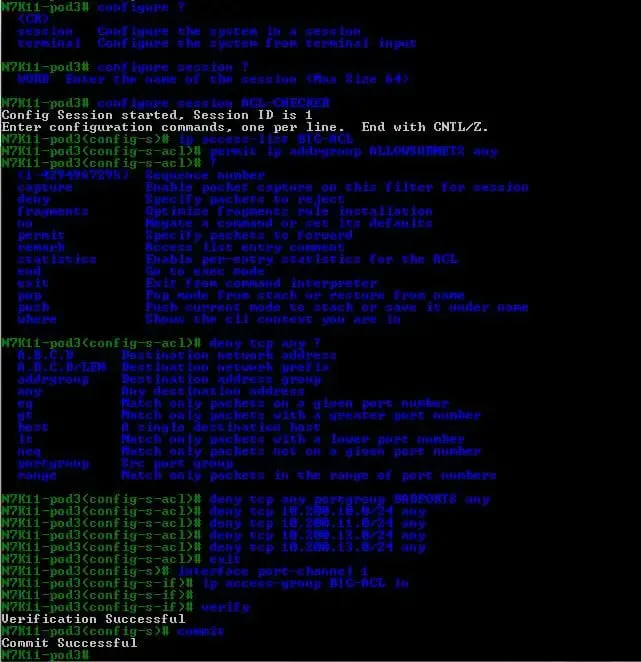
- Step 2 – Exit global configuration mode and reenter using the configure session command.
Name our session ACL-CHECKER
N7K11-pod3# configure session ACL-CHECKER
- Step 3 – Create an IP access list named BIG-ACL.
N7K11-pod3(config-s)# ip access-list BIG-ACL
- Step 4 – Assign the object-groups named ALLOWSUBNETS and BADPORTS created in Step 1 above to the IP access list BIG-ACL.
N7K11-pod3(config-s-acl)# permit ip addrgroup ALLOWNETS any
N7K11-pod3(config-s-acl)# deny tcp any port-group BADPORTS any
- Step 5 – Add the following deny statements to the access list named BIG-ACL.
N7K11-pod3(config-s-acl)# deny tcp 10.200.10.0/24 any
N7K11-pod3(config-s-acl)# deny tcp 10.200.11.0/24 any
N7K11-pod3(config-s-acl)# deny tcp 10.200.12.0/24 any
N7K11-pod3(config-s-acl)# deny tcp 10.200.13.0/24 any
N7K11-pod3(config-s-acl)# exit
- Step 6 – Assign the IP access list BIG-ACL to the port channel interface within our pod. VDC in the ingress direction.
N7K11-pod3(config-s)# interface port-channel 1
N7K11-pod3(config-s-if)# ip access-group BIG-ACL in
N7K11-pod3(config-s-if)# exit
- Step 7 – Verify the configuration session ACL-CHECK.
N7K11-pod3(config-s)# verify
Verification Successful
- Step 8 – If the operation in Step 7 was successful, then commit the session to the running configuration.
N7K11-pod3(config-s)# commit
Commit Successful
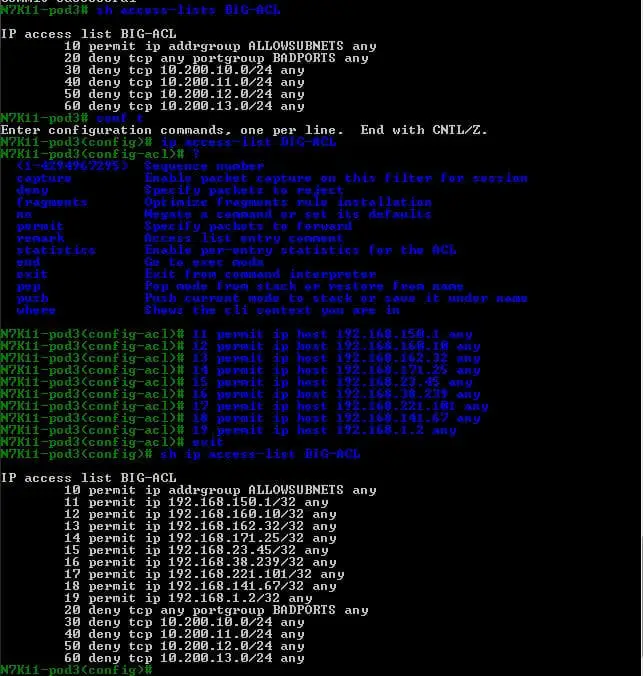
We can check our access-list just configured by ” show access-list BIG-ACL.” Also, we can insert multiple sequences in between our access-list sequence; here, we will insert sequences 11 to 19 between 10 and 20.
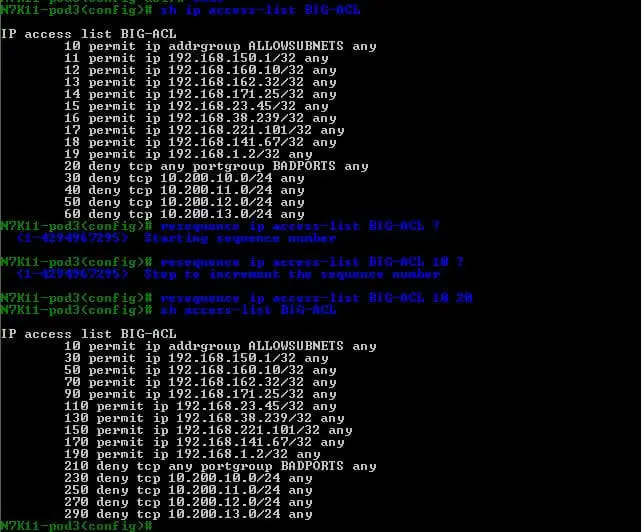
We can resequence the ACL also by using “resequence ip access-list BIG-ACL [start-seq] [end-seq],” and we can verify our new restructured ACL.
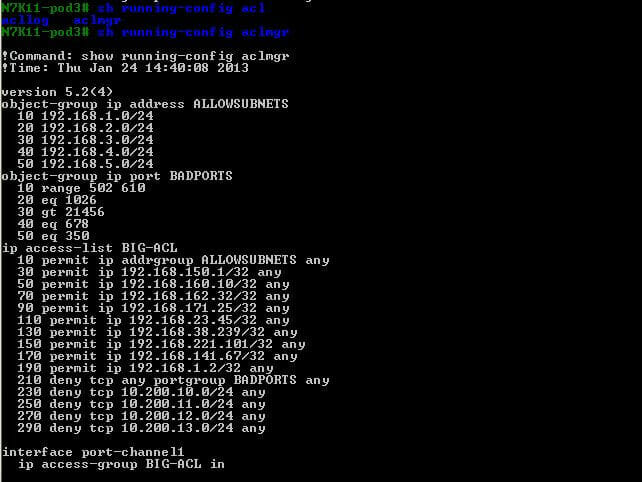
We can use several Show commands like “show ip access-list” and ” sh access-list” to check our configuration “; one cool command is “Show running-config aclmgr”

Great post. I am experiencing a few of these issues as well..