If you’re a Comcast Xfinity customer and just received the Xfinity Welcome Kit, you can self-install the received equipment and do the entire home network setup in less than half an hour and avoid a typical professional installation fee of about $100. Standard self-install kit shipping is usually about $15 (often waived if you pick up in-store), and Self-Install Plus is about $39.99 in many markets. Actual fees vary by market and promotions.
This comprehensive guide will walk you through the complete Xfinity wireless internet setup process, including self-installation and activation of the xFi Gateway or compatible third‑party modem, and setting up Wi‑Fi, with clear instructions, alternative methods, troubleshooting tips, and more. Throughout this guide, “xFi Gateway” refers to Xfinity’s all‑in‑one modem/router (XB6/XB7/XB8/XB10). If you’re using your own modem and router, we’ll note the differences where it matters.
Overview: How to set up Xfinity Wi‑Fi yourself
Installing Comcast Xfinity wireless internet service yourself (self-installation) is a straightforward process most people can complete in about 10–20 minutes once everything is in place. Self-installation lets you get connected on your schedule without waiting for a technician.
The key things you’ll need are:
- Xfinity self-install kit (xFi Gateway or compatible modem, power, coax and/or Ethernet)
- Xfinity app (not the Xfinity Mobile app)
- Active in-home connection: either a coaxial cable outlet for cable (DOCSIS) service or an Ethernet handoff from a wall‑mounted fiber ONT for Xfinity fiber service
With those items ready, connecting and activating your new Xfinity internet service is quick. We’ll cover the full step-by-step process shortly. First, let’s go over optimal placement for your gateway/modem device that powers your Xfinity Wi‑Fi.
Where to Place Your Xfinity Gateway
Your Xfinity gateway is the central device that projects your in-home Wi‑Fi signal and connects to the internet. It’s often referred to as a modem/router combo device.
Choosing the right location to place this equipment is important for getting the best Wi‑Fi coverage throughout your home. Here are three key factors to consider when picking an installation spot:
1. Central Location
Ideally you want your Xfinity gateway located centrally within your home, up off the floor on an open shelf or table. The more centrally positioned it is, the more easily the Wi‑Fi signal can reach all areas of your house. Good central locations include:
- Living room
- Family room
- Kitchen
- Dining room
Positioning the gateway in a central home location helps the signal radiate with fewer obstacles. In multi‑story homes, place it on the middle floor when possible. Avoid closets, cabinets, or metal enclosures.
2. Near a Coaxial Outlet
Your Xfinity gateway needs to physically connect to the incoming internet signal from outside your home. If you have cable (DOCSIS) service, this is done via a coaxial cable wall connection—the same type of cable used for cable TV. If your home is served by Xfinity fiber, you’ll connect an Ethernet cable from the wall‑mounted ONT (optical network terminal) to the gateway’s WAN/Internet port (no coax).
So when picking your installation spot, place it near the correct handoff: a coaxial outlet for cable service or the ONT’s Ethernet handoff for fiber. Many homes have multiple coaxial hookups in rooms like bedrooms or offices that feed the main line from outside.
If none of your rooms have the appropriate outlet or ONT access, you may need additional wiring or a professional installation.
3. Away From Interference
Like all Wi‑Fi routers, your gateway transmits wireless internet via radio signals. Performance can suffer from interference caused by other devices emitting radio waves or by dense building materials.
It’s best to position your new Xfinity gateway away from potential sources of signal interference. This includes:
- Microwaves
- Baby monitors
- Cordless phones
- Bluetooth devices
- Neighbors’ Wi‑Fi networks
Keep a few feet of space from these electronics, place the gateway in the open, and expect the strongest signal within one to two rooms. In larger homes, consider adding Wi‑Fi extenders or Xfinity Pods.
How to Self‑Install Xfinity Internet
Preparation
Before starting your self-installation process, ensure you have the Xfinity Welcome Kit, including an xFi Gateway or compatible cable modem, required cables, and the Xfinity app installed and signed in with your Xfinity ID.
Step-by-step: Xfinity Wireless Internet Setup
- Connect Cables and Power on the Gateway:
- Find the correct handoff: For cable (DOCSIS), use a coaxial wall outlet. For fiber, use the Ethernet handoff from your wall‑mounted ONT to the gateway’s WAN port.
- Connect the gateway: For cable, connect the coax to the wall and to the gateway. For fiber, run an Ethernet cable from ONT to the gateway’s WAN/Internet port.
- Connect to power: Plug the power cord into the gateway and then into an electrical outlet.
- Allow the gateway to start up: Wait about 5 minutes until it’s ready for activation (LED behavior varies by model).
- Connect Devices to the Gateway using Wi‑Fi or Ethernet Cable
- Activate the Xfinity Modem/Gateway: Open the Xfinity app > Account > Devices > Activate xFi Gateway or Modem, then follow the prompts. If needed, go to xfinity.com/activate from a device connected to the gateway or call 1‑800‑XFINITY.
- Confirm status lights: On xFi Gateways, a solid white status light indicates online. On third‑party modems, the “Online” LED should be solid.
- Check Internet Speeds and do troubleshooting if required.
- Optional Professional Help from Xfinity
Step 1: Connect Cables and Power On Gateway
With your equipment spot selected, it’s time to get your hardware plugged in. The key gear that comes with an Xfinity self-install kit includes:
- Xfinity gateway device – This is the modem/router that delivers Wi‑Fi and connects to the internet. It’s an all‑in‑one unit.
- Coaxial cable – Use this if your service is cable (DOCSIS) and you’re connecting to a coaxial wall outlet.
- Ethernet cable – Use this if your home has an Xfinity fiber ONT and you’re connecting the ONT to the gateway’s WAN/Internet port.
- Power cable – This plugs into your gateway and wall outlet to deliver electricity.
Follow these steps to get your new equipment hooked up:
Connect the Coaxial Cable
First, locate the coaxial cable outlet nearest to where you’ve positioned your Xfinity gateway if you have cable (DOCSIS) service.
Next, take the coaxial cable that came with your install kit and connect one end to this wall outlet. Hand‑tighten the connector.
Lastly, take the other end of the coaxial wire and plug it into the coaxial port on the back of your gateway device. If your home uses fiber, skip coax and use Ethernet from the ONT to the gateway’s WAN/Internet port.
This single connection to your home’s service handoff enables the gateway to tap into your Xfinity internet.
⚠️Key Point: Only hand-tighten coaxial cable connections instead of using tools. Over-tightening can damage the equipment.
Connect Power
With your gateway now wired to receive the incoming internet signal, next you need to power it on.
Take the power cable from your install kit and plug one end into your gateway. Connect to the coax or ONT first, then connect power.
Next, plug the other end of the power cable into an electrical outlet. If the gateway doesn’t turn on automatically, press the power button.
Allow Gateway to Update Upon Initial Bootup
On first start, the gateway initializes and may update its software. This typically takes about 5 minutes. LED behavior varies by model; you can begin activation in the Xfinity app once the light indicates readiness.
During startup the light will blink while connecting. On xFi Gateways, a solid white light indicates it’s online and ready.
Leave the gateway powered on throughout this first boot sequence to avoid interruptions.
With this step done, your equipment is ready to broadcast your Xfinity Wi‑Fi network.
Step 2: Connect Devices to Your Gateway
Now that your new gateway is online after its first-time bootup, connect devices like phones, laptops, and smart home gadgets using either Wi‑Fi or Ethernet.
Option 1: Connect Via Wi‑Fi
The easiest way is via your device’s Wi‑Fi settings to detect and join the Xfinity network.
Open your device’s network settings and select your new Xfinity SSID (network name) from the list.
💡Pro Tip: Your Xfinity network name and Wi‑Fi password are printed on a label on the bottom of your gateway. Write them down for easy reference.
After selecting your Wi‑Fi network name, enter the unique password when prompted to connect.
Option 2: Connect Via Ethernet Cable
Devices near your Xfinity gateway can connect directly using an Ethernet cable for the most stable connection.
Plug one end of an Ethernet cord into your device and the other end into an open LAN port on the back of your gateway.
With multiple LAN ports, you can directly connect several devices in the same room.
Now, let’s activate your Xfinity modem or xFi Gateway.
What is Xfinity Modem Activation?
Xfinity modem activation is the process of setting up your modem or xFi Gateway to connect to the Xfinity network. This ensures your device is properly configured to deliver internet (and voice, if applicable). Whether you’re using an Xfinity xFi Gateway or your own compatible modem, activation is required to start service.
How to Activate Xfinity Modem?
Using the Xfinity App
The Xfinity app provides a simple and convenient way to activate your device. Here’s how:
- Download and open the Xfinity app on your phone or tablet, then sign in with your Xfinity ID and password.
- If you aren’t automatically prompted, go to Account > Devices > Activate xFi Gateway or Modem.
- Follow the on‑screen steps to complete activation.
Using the Xfinity Web Portal
If you prefer to use a computer, the Xfinity web portal is another option for activating your modem:
- Go to xfinity.com/activate.
- Sign in using your Xfinity ID and password.
- Follow the on-screen instructions to complete the activation.
The activation process only takes a few minutes. It registers your equipment with Comcast and turns on access so you can begin using your internet connection.
Contacting Xfinity Customer Support
If you’re having trouble with the app or web portal, or if you simply prefer to speak with a representative, you can call Xfinity customer support for assistance:
- Dial 1-800-XFINITY (1-800-934-6489).
- Follow the automated prompts to reach the modem activation department.
- Provide the necessary information to complete activation.
If you’re switching modems or returning your old device, our guide on how to return Xfinity equipment can help you navigate the process.
Once you’ve successfully activated your modem, you might want to consider optimizing your setup with the best router for Xfinity to ensure you’re getting the most out of your internet service.
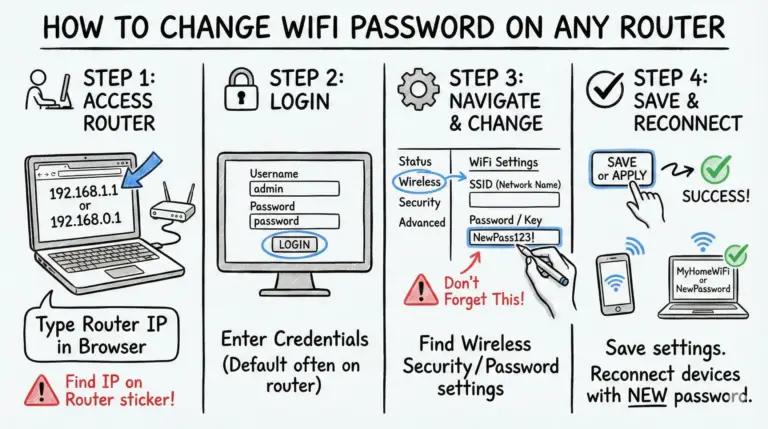
Customize Your Wi‑Fi Network
As part of activation, you can customize your wireless network name and password.
Personalizing these settings makes your network easier to recognize. Changing the default password strengthens security.
We recommend updating both your SSID and Wi‑Fi password during setup to something personalized and secure.
And that’s it! With the key steps complete—connecting equipment, linking devices, and activating service—you now have a functioning Xfinity wireless network installed in your home.
Checking Internet Speeds and Troubleshooting
Now that you’re up and running, a couple useful next steps are:
Test Your Internet Speeds
Verify you’re getting the speeds you enrolled for. Xfinity offers a reliable site for testing speeds on your network.
Head to speedtest.xfinity.com on any connected device and run a test. App‑based features like “speed to gateway” can vary by app version.
The results will confirm if your setup is performing as expected. If speeds seem slower than expected, proceed to troubleshooting.
Troubleshooting Xfinity Modem Activation
Even with these instructions, you might encounter issues during the activation process. Here are some common problems and their solutions:
- Modem/Gateway Not Connecting: Ensure you’re using the correct handoff (coax for cable, Ethernet from ONT for fiber), and that power is on. If it’s still not connecting, reboot the gateway and try again.
- Unable to Sign In: If you’re having trouble signing in to the Xfinity app or web portal, double-check your Xfinity ID and password, or reset your password.
- Activation Fails: Restart the gateway and repeat the process via the Xfinity app (Account > Devices > Activate xFi Gateway or Modem). If it still fails, visit xfinity.com/activate from a connected device or contact Xfinity support.
- Status Light Clues: On xFi Gateways, a solid white light indicates online. Blinking during setup is normal; persistent blinking or amber/yellow often indicates it’s not fully online—recheck cabling or try activation again. On third‑party modems, confirm the Online LED is solid.
- Admin Tool Access: On newer gateways, local admin access at
10.0.0.1may be controlled from the Xfinity app. If you can’t reach it, enable Admin Tool access in the app, then try again.
After activation, it’s helpful to understand what the lights on your device indicate. Our article on Xfinity modem lights provides a comprehensive overview.
Can I Use My Own Device to Activate and Install Xfinity Modem?
Yes, you can use your own compatible device for replacing Xfinity modem by following a few simple steps in the Xfinity app or via xfinity.com/activate. Follow the provided instructions to complete the activation process seamlessly.
Can I Use Xfinity Bridge Mode with Self-Installed Modem?
Bridge Mode applies to Xfinity xFi Gateways (it is not needed on standalone customer‑owned cable modems). Enabling Bridge Mode disables certain xFi features and Pod compatibility. You can turn it on via the Admin Tool at 10.0.0.1 after allowing Admin Tool access in the Xfinity app. Learn more in our guide to Xfinity bridge mode.
Conclusion
Activating your Xfinity modem or xFi Gateway is a key step in setting up your internet and voice services. Whether you use the Xfinity app, web portal, or customer support, the process is designed to be straightforward. With the alternative methods and troubleshooting tips above, you’re ready to activate your modem and enjoy your Xfinity services.
- Telecom Network Infrastructure: Complete Guide to Components & Design - January 6, 2026
- TP-Link TL-SG108E vs Netgear GS308E: Budget Smart Switches - January 5, 2026
- MikroTik CRS305-1G-4S+ Review: The Ultimate Budget SFP+ Switch Guide - December 25, 2025