As network engineers, we often need to provide a Cisco “show tech-support” output or other extensive Command Line Interface (CLI) logs to the Cisco Technical Assistance Center (TAC) for a support case. However, the sheer size of these outputs can make it challenging to copy the entire content from the terminal window in one go.
Thankfully, there’s a simple method using a classic tool that makes this process effortless. In this updated guide, I’ll walk you through the exact steps to configure PuTTY to automatically capture and save these large CLI outputs to a file on your computer.
How to Save Large CLI Outputs with PuTTY (Step-by-Step)
Follow this consolidated process to get your session logging set up and capture the data you need.
-
Configure PuTTY for Session Logging
Before you connect to your device, you need to tell PuTTY to start logging. If you don’t have it, you can download PuTTY for free from the official website.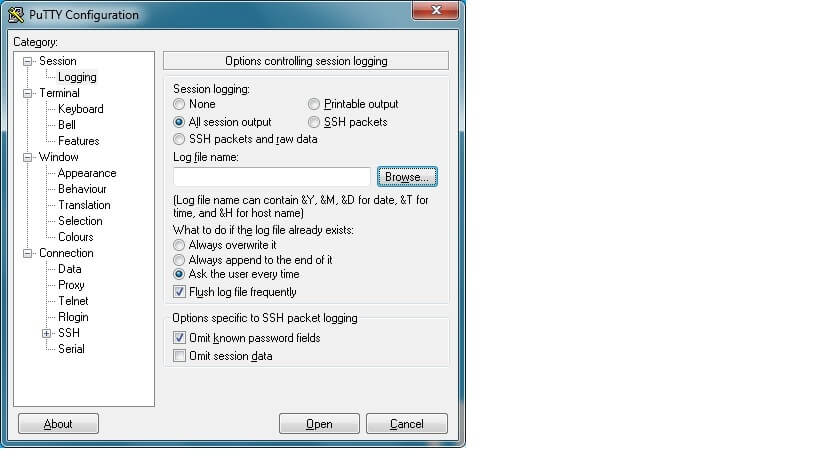
Configuring PuTTY to log all session output to a file. - Open PuTTY. In the configuration window, navigate to Session → Logging in the left-hand pane.
- Under “Session Logging,” select the option for “All session output.”
- Click the “Browse” button next to the “Log file name” field and choose a location and name for your log file.
- Navigate back to the “Session” screen, select “Default Settings,” and click “Save” to make this your default for future sessions.
-
Connect and Prepare Your Cisco Device
Now that logging is enabled, connect to your device.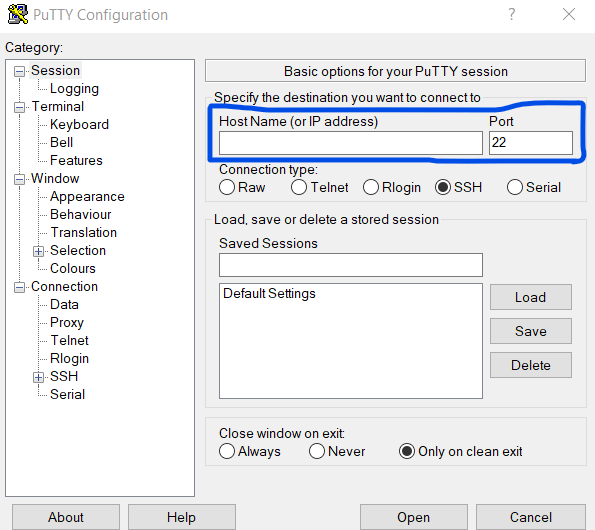
Enter the device IP address or hostname to begin the session. - Enter the IP address or hostname of your Cisco device and click “Open.”
- Once you are logged in and in the privileged EXEC mode (e.g.,
Router#), enter the command:terminal length 0. This crucial step tells the Cisco IOS device to display the entire command output at once, without pausing for “–More–” prompts.
-
Run the Command and Capture the Output
With everything prepared, simply run the command you need. The entire terminal output will be automatically written to the log file you specified.- Type the
show tech-supportcommand and press Enter. - Wait for the command to complete. Once you are returned to the prompt, you can close the session. The complete output is now saved in your log file, ready to be attached to a TAC case or analyzed.
- Type the
Pro-tip: Name your log file with the device hostname and date (e.g.,
Core-Switch_tech-support_2025-12-10.log) for easy identification later. This is especially helpful when working on multiple devices.
A Note on Modern Terminal Emulators
While this guide focuses on PuTTY, a classic and reliable tool, many modern terminal emulators like Windows Terminal, SecureCRT, and MobaXterm also have robust session logging features built-in. The general principle of enabling logging before you connect remains the same across these applications.
Frequently Asked Questions (FAQ)
Why is the `terminal length 0` command important?
By default, Cisco IOS devices pause long outputs after a certain number of lines (usually 24) and display a “–More–” prompt. The terminal length 0 command disables this paging for your current session, ensuring the entire output of commands like show tech-support scrolls by without interruption, which is necessary for a clean capture to your log file.
What if my log file is empty after the session?
First, double-check your PuTTY configuration under Session → Logging to ensure “All session output” is selected. Second, verify that you have write permissions for the folder where you are trying to save the log file. If you saved the PuTTY session settings, try restarting PuTTY and loading your saved session before connecting.
Can I use this method on macOS or Linux?
Yes, the principle is the same, but the tools are different. On macOS and Linux, you can use the built-in Terminal and the script command. Before connecting via SSH, simply run script my_log_file.txt. This will start recording everything in your terminal session to that file. After you are done, type exit to stop the recording.
And that’s it! A straightforward way to ensure you never miss a line when capturing critical diagnostic information. Happy troubleshooting!
- pfSense 10G Home Lab Setup: Complete Hardware Guide (2026) - April 1, 2026
- Best Budget Home Lab Setup Under $300 (2026): Complete Starter Stack - March 30, 2026
- Best Modems for Spectrum: Top DOCSIS 3.1 Picks That Actually Work - March 28, 2026
Helping me out 8-9 years later. I knew about Putty logging but had a brain fart. Thanks for sharing your struggle. You’re a real one. TYVM.
Thank you!
i only get so far with sh tech, and then putty window closes on me….seems to be too big even for this solution…what do i do?
excellent…it helped me
thank you
a better sollution:
sh tech-support | tee flash:/tech-support