Hey there, router users! If you’ve ever found yourself scratching your head while staring at your TP-Link router, wondering what all those flashing lights could possibly mean, you’re not alone. As one of the leading router brands on the market, TP-Link equips their devices with a variety of LEDs to serve as status indicators. Understanding these lights is crucial for troubleshooting any issues that may arise with your network connection.
In this guide, we’ll break down the meanings behind each light on your TP-Link router, so you can quickly diagnose and solve any problems that come your way. So, let’s dive in and shed some light on the subject!
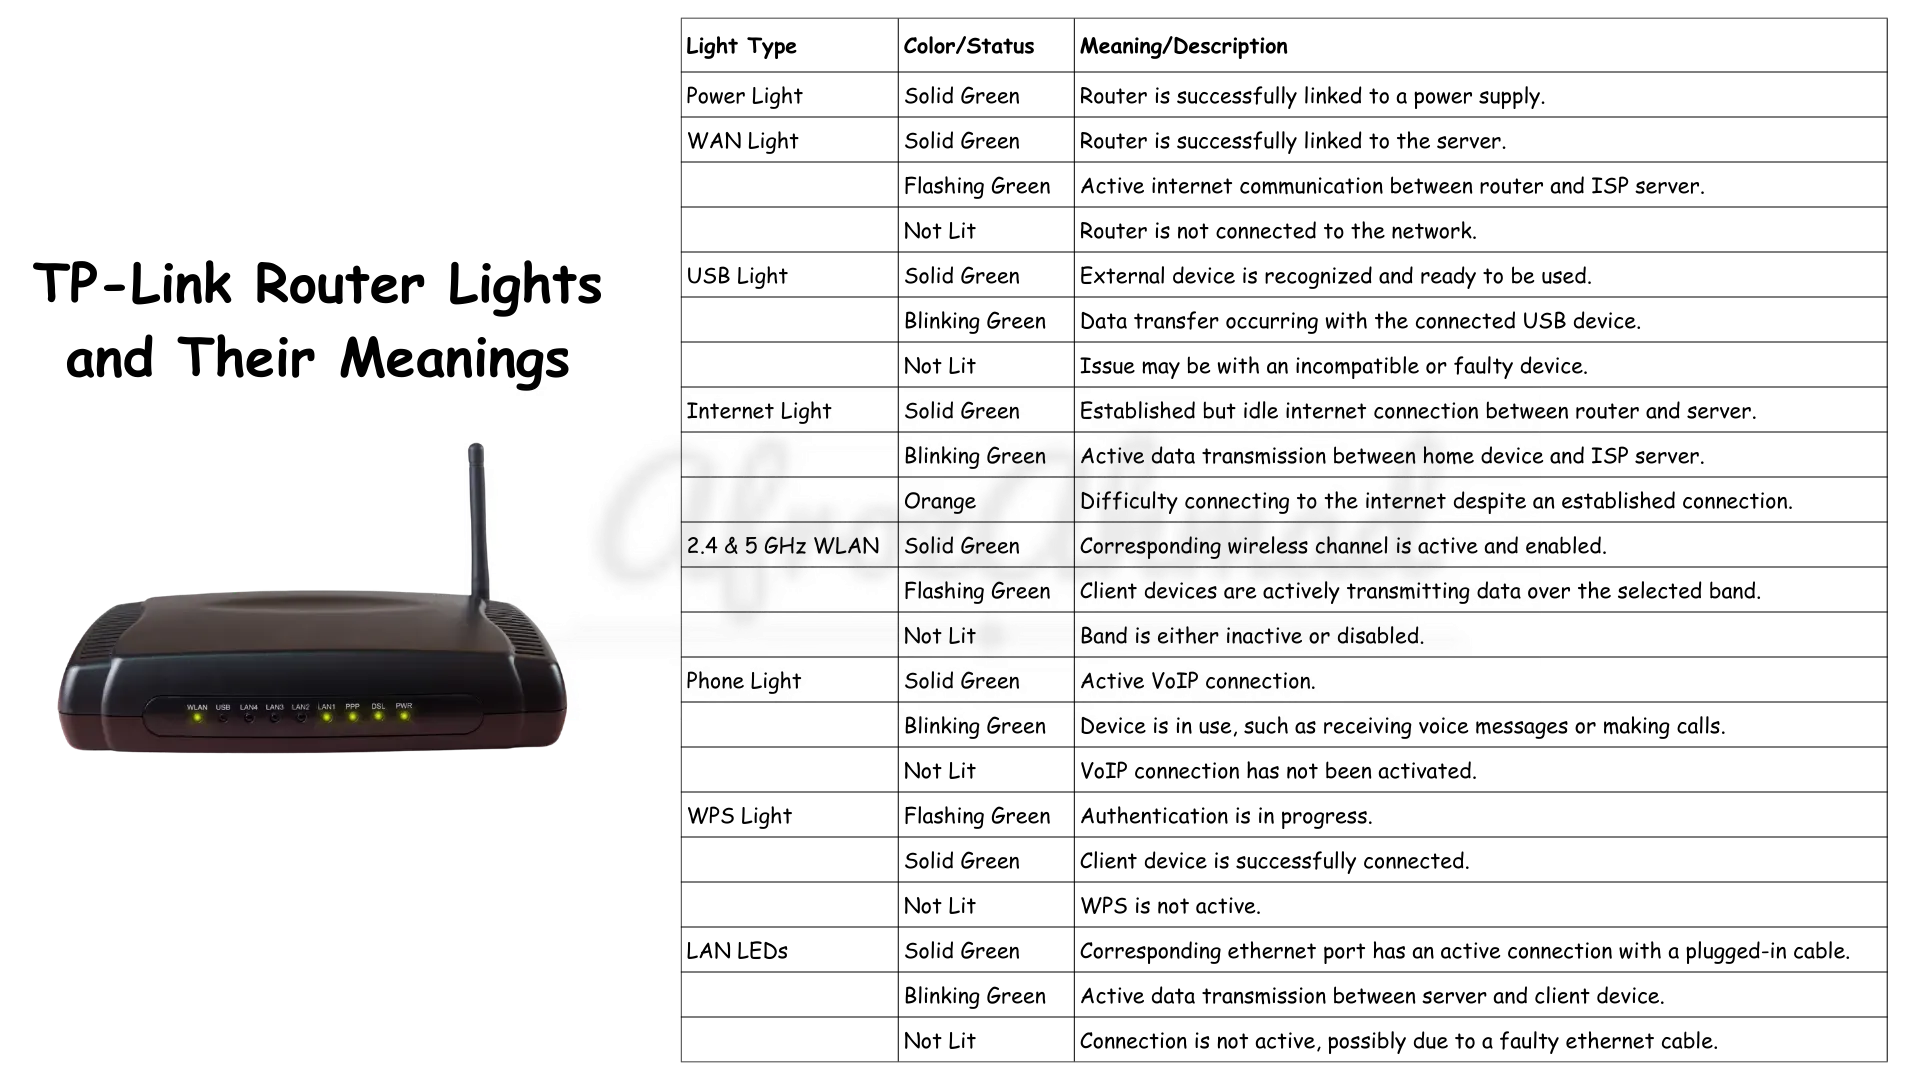
TP-link Router Lights Types and Colors – Summary
| Light Type | Color/Status | Meaning/Description |
|---|---|---|
| Power Light | Solid Green | Router is successfully linked to a power supply. |
| WAN Light | Solid Green | Router is successfully linked to the server. |
| Flashing Green | Active internet communication between router and ISP server. | |
| Not Lit | Router is not connected to the network. | |
| USB Light | Solid Green | External device is recognized and ready to be used. |
| Blinking Green | Data transfer occurring with the connected USB device. | |
| Not Lit | Issue may be with an incompatible or faulty device. | |
| Internet Light | Solid Green | Established but idle internet connection between router and server. |
| Blinking Green | Active data transmission between home device and ISP server. | |
| Orange | Difficulty connecting to the internet despite an established connection. | |
| 2.4 & 5 GHz WLAN | Solid Green | Corresponding wireless channel is active and enabled. |
| Flashing Green | Client devices are actively transmitting data over the selected band. | |
| Not Lit | Band is either inactive or disabled. | |
| Phone Light | Solid Green | Active VoIP connection. |
| Blinking Green | Device is in use, such as receiving voice messages or making calls. | |
| Not Lit | VoIP connection has not been activated. | |
| WPS Light | Flashing Green | Authentication is in progress. |
| Solid Green | Client device is successfully connected. | |
| Not Lit | WPS is not active. | |
| LAN LEDs | Solid Green | Corresponding ethernet port has an active connection with a plugged-in cable. |
| Blinking Green | Active data transmission between server and client device. | |
| Not Lit | Connection is not active, possibly due to a faulty ethernet cable. |
Overview of TP-Link Router Lights
Most TP-Link routers have a similar set of LED indicators, each with its own specific function. Here’s a rundown of the lights you’ll typically find on your device:
- Power LED: Indicates whether the router is powered on and functioning properly.
- Internet/WAN LED: Shows the status of your internet connection through the Wide Area Network (WAN) port.
- Ethernet/LAN LEDs: Represent the status of wired connections to your router via the Local Area Network (LAN) ports.
- WiFi LEDs: Display the status of your wireless network, often separated into 2.4GHz and 5GHz bands.
- WPS LED: Indicates the status of the WiFi Protected Setup (WPS) feature, which allows for easy wireless device pairing.
- USB LED (if applicable): Shows the status of any connected USB devices, such as external hard drives or printers.
LED Colors and Their Meanings
Now that you know what each light represents, let’s talk about what the different colors and patterns signify:
- Solid green: This is the color you want to see! A solid green light usually means the associated function is working normally.
- Flashing/blinking green: Typically indicates network activity or traffic on that particular LED. No need to worry; this is a good sign!
- Yellow/orange: A yellow or orange light on the TP-link router often suggests a warning or error, such as a weak signal or authentication issue.
- Red: Uh-oh, red alert! This color generally points to a serious problem or malfunction, like a failed connection or hardware issue.
- No lights: If an LED is completely off, it usually means that particular function is disabled, or there’s a power or connection problem.
Model-Specific TP-Link Router Light Behaviors
While most TP-Link routers follow similar light patterns, there can be slight variations between models. Here are a few noteworthy differences:
- TP-Link Archer Series (A, C, AX models): Some Archer models have separate lights for the 2.4GHz and 5GHz bands, while others use a single light to represent both.
- TP-Link Deco Mesh System Lights: Deco mesh routers often use a single, multi-color light to indicate the system’s status. Refer to your Deco’s manual for specific color meanings.
- Differences between Wi-Fi 5 and Wi-Fi 6 TP-Link Router Lights: Wi-Fi 6 (802.11ax) routers may have additional lights or indicators related to advanced features like OFDMA or MU-MIMO.
- Older TP-Link Router Light Meanings: If you have an older TP-Link router model, the light meanings may differ slightly. Always consult your specific router’s manual or support resources for accurate information.
Troubleshooting Common Issues
Armed with your new knowledge of TP-Link router lights, you’re ready to start troubleshooting any issues that may pop up. Here are some common problems and how to identify them:
- Internet down: If your Internet/WAN LED is solid red or off, your router may have lost its connection to your modem or ISP. Double-check all cables and reboot your modem and router.
- No WiFi: When your WiFi LEDs are off, your wireless network is likely disabled. Log into your router’s settings and ensure the WiFi function is turned on.
- Ethernet not working: If one of your Ethernet/LAN LEDs is off or red when a device is plugged in, there may be a problem with the cable or the connected device. Try a different cable or port to isolate the issue.
- Connection drops: Lights that flash erratically or turn red intermittently could point to an unstable connection. This may be due to interference, distance, or outdated firmware. Consider repositioning your router or updating its settings.
- Overheating: In rare cases, all LEDs may flash together, indicating your router is overheating. Ensure it has proper ventilation and isn’t located near heat sources.
Using Lights for Setup and Configuration
Your TP-Link router’s lights aren’t just for troubleshooting; they can also guide you through the initial setup process and help you confirm configuration changes. Here’s how:
- During setup, the LEDs will flash in a specific pattern to indicate the router is ready for configuration. Consult your manual for model-specific instructions.
- If you’re using WPS to connect devices, the WPS LED will flash to show pairing mode is active, then turn solid once a connection is established.
- After making changes to your router’s settings, certain lights may blink or change color to confirm the new configuration has been applied.
Lights Indicating Security Status
In addition to connection status, your TP-Link router’s lights can alert you to potential security issues:
- A rapidly flashing WPS LED could mean someone is trying to gain unauthorized access to your network using the WPS feature. If you didn’t initiate the pairing process, you may want to disable WPS in your router’s settings.
- Unusual activity on your Ethernet/LAN or WiFi LEDs, such as constant flickering when you’re not actively using the network, could indicate a possible breach or hack attempt. Check your router’s logs and connected devices list for any suspicious entries.
Tips for Optimal TP-Link Router Performance
To keep your TP-Link router running smoothly and ensure optimal performance, consider the following tips:
- Ideal Router Light Statuses to Look For:
- Power light: Solid on
- Internet/WAN light: Solid or blinking (indicating active connection)
- Wireless lights: Solid (bands enabled) or blinking (data transmission)
- Ethernet/LAN lights: Solid (device connected) or blinking (data transmission)
- Router Placement for Best Light Visibility:
- Place your router in a central, open location for the best Wi-Fi coverage.
- Ensure the router’s lights are easily visible for quick status checks.
- Avoid placing the router in enclosed spaces or behind objects that may obstruct the lights.
- Using TP-Link Router Lights for Network Troubleshooting:
- Regularly check your router’s lights for any unusual behavior or patterns.
- Use the light statuses to identify potential issues and narrow down the problem area.
- Refer to TP-Link’s support resources or manual for specific troubleshooting steps based on the light indicators.
- Built-in Router Tools for Error Light Diagnosis:
- Access your router’s web interface by entering its IP address in a web browser.
- Look for diagnostic tools or logs that may provide more information about the error lights.
- Some TP-Link routers offer a built-in network map or status page that can help identify connected devices and network issues.
When to Check Your Router Manual
While this guide covers the general meaning of TP-Link router lights, it’s important to remember that specific colors and patterns may vary slightly between models. If you’re unsure about the meaning of a particular light on your device, it’s always a good idea to consult the official manual for your specific router model.
Additionally, if you’re looking to perform advanced configuration or troubleshooting, such as changing your router’s operating mode or updating its firmware, the manual should be your go-to resource for step-by-step instructions and model-specific information.
Contacting TP-Link Support
If you’ve exhausted all troubleshooting steps and your router lights continue to indicate a problem you can’t solve on your own, it may be time to reach out to TP-Link’s customer support team. They can provide expert guidance and help you determine if your issue is due to a hardware malfunction or defect.
In some cases, your router may be covered under TP-Link’s warranty, entitling you to a repair or replacement. Have your device’s model number and proof of purchase handy when contacting support, as they’ll need this information to process any warranty claims.
Conclusion
By now, you should have a solid grasp on what your TP-Link router’s lights are trying to tell you. Understanding these status indicators is key to diagnosing and resolving network issues quickly and efficiently.
Remember, while this guide is a great starting point, don’t hesitate to consult your router’s manual or reach out to TP-Link support for model-specific guidance or complex problems. With a little know-how and some troubleshooting skills, you’ll be keeping your home network running smoothly in no time!
FAQ
What do I do if no lights are on at all?
If your router appears completely dark, first check that it’s properly plugged into a power outlet and the power switch (if present) is turned on. If the issue persists, you may need to contact TP-Link support for further assistance, as this could indicate a hardware failure.
Why is my internet light red?
A solid red Internet/WAN LED typically means your TP-Link router is not receiving a valid IP address from your modem or ISP. This could be due to a connection issue between the router and modem, a problem with your modem’s configuration, or an outage on your ISP’s end. Try rebooting both your modem and router, and if the problem persists, contact your ISP for help.
How can I troubleshoot flashing lights?
The meaning of flashing lights will depend on the specific LED and the color/pattern of the flashing. In general, flashing green is normal and indicates network activity, while flashing yellow/orange or red suggests a problem. Consult the troubleshooting section of this guide or your router’s manual for specific guidance based on which light is flashing.
What does the WPS button do?
The Wi-Fi Protected Setup (WPS) button on your TP-Link router allows you to easily connect WPS-compatible devices to your wireless network without entering a password. When you press the button, the router enters pairing mode, indicated by a flashing WPS LED. You can then activate WPS on your device to establish a secure connection. Keep in mind that WPS can be vulnerable to security risks, so it’s often recommended to disable it when not in use.
- NETGEAR Nighthawk (RAX54S) WiFi 6 Router Review - August 24, 2024
- TP-Link AX1800 Archer AX21 WiFi 6 Router Review - August 24, 2024
- How to Connect Nanit to Hotel WiFi? - August 12, 2024


