- What is Routing Information Protocol RIP?
- RIP Operation – How does Routing Information Protocol RIP work?
- Pros and Cons of RIP Protocol
- RIP Versions (V1 and V2) and RIPng
- RIP Features – Updates Types
- RIP Features – Metrics and Timers
- RIP Basic Configuration – Network Statement and Passive Interface
- RIP Split Horizon
- RIP Triggered Updates
- RIP Summarization
- RIP Filtering
- RIP Authentication Support
- Conclusion
In this post, we’ll define what is Routing Information Protocol or RIP and how it works, and show its pros and cons before diving into details like versions (RIP v1 and v2), timers, update types, and configuration. We will also discuss split horizon, authentication support, summarization and filtering techniques, and how to originate a default route in RIP.
Let us get started.
What is Routing Information Protocol RIP?
RIP is one of the dynamic routing protocols and the first distance-vector routing protocol that uses the hop count as a routing metric. A lower hop count is preferred.
Each router between the source and destination network is counted as one hop. RIP prevents routing loops by imposing a maximum number of hops on the path between source and destination. Unfortunately, the maximum number of hops permitted by RIP is 15, limiting the size of networks it can support.
Due to hop count limitation, Open Shortest Path First (OSPF) has replaced RIP almost everywhere in today’s modern network.
In RIP, Every 30 seconds, each router broadcasts its entire routing table to its nearest neighbors.
RIP utilizes the split-horizon, route poisoning, and hold-down methods to prevent the propagation of inaccurate routing information.
RIP Operation – How does Routing Information Protocol RIP work?
RIP uses a distance vector algorithm and a hop count as a metric for routing packets to their destinations. Every RIP router maintains a routing table with all the destinations it can reach and publishes its routing table every 30 seconds. Neighbors are other routers to which a router is directly connected on the same network segment. The neighbors send the information to their next neighbors, and so on until all RIP hosts have the same routing path knowledge. It’s called convergence.
When a router receives an update on a route and the new path is shorter, it updates its table entry with the path’s length and next-hop address. If the new network path is longer, it will wait during a “hold-down” period to see if the following updates reflect the higher value. Then, it only updates the table if the longer path is stable.
When a router crashes or a network connection is lost, the network learns it because the router stops delivering updates to its neighbors or along the downlink. For example, if a route in the routing table isn’t updated for 180 seconds (six update cycles), a RIP router will drop it and let the rest of the network know about the problem.
Some key Facts about RIP:-
- All RIP messages are encapsulated in UDP port 520 as source and destination ports.
- RIP has two message types:
- Request – It is used to request an update from neighboring routers.
- Response – It is used to send the update to neighbors.
- If a router needs to deliver an update with more than 24 route entries, it will generate additional RIP messages.
- If multiple routes with equal hop counts exist to the same destination, equal-cost load balancing will be applied.
- RIP recognizes secondary IP addresses on interfaces as separate data interfaces and can exchange routes with a secondary IP.
- If several addresses are present on an interface, RIP will transmit an update packet for each RIP-enabled interface.
- RIP performs a source-validation check, which requires that the source IP address of incoming routing updates be on the same IP network as the receiving interface address.
- It may be necessary to disable source validation when the source address is on a different subnet than the locally specified address, i.e., the local side has a /32, and the remote side has a /25. You can use “debug ip rip events.” to see this.
- Output-delay
- Sets an inter-packet gap between 8 and 50 msec (default=0).
- Used when a high-speed router sends updates to a low-speed router.
BASIC RIP Commands
- ping 224.0.0.9 –> Can be used to check RIPv2 enabled routers, they will respond to ping.
- debug ip rip events –> Useful command to show RIP protocol events
- router rip –> Used to Enable the RIP process on cisco routers.
- network 10.0.0.0 –> Will advertise any 10.0.0.0 matching interface in RIP.
- no validate-update source –> This will disable the validation of the source address in updates
- output-delay {ms} –> This command will set an inter-packet gap (value 8-50) (default=0).
Pros and Cons of RIP Protocol
Pros:
- The RIP protocol is ideal for small networks since it is simple to learn and configure.
- RIP routing is guaranteed to work with nearly all routers.
- When the network topology changes, RIP does not require an update.
Cons:
- RIP does not support variable length subnet masks (VLSM).
- RIP transmits updates every 30 seconds; RIP can cause a traffic bottleneck. Because any routing update in RIP consumes a lot of bandwidth, resources for key IT tasks are constrained.
- Because RIP hop counts are restricted to 15, any router beyond that distance is deemed infinity and thus unreachable.
- The rate of convergence is slow in RIP compared to other routing protocols. When a link fails, finding alternate network paths takes a long time.
- RIP does not support Multiple paths on the same route, which may result in extra routing loops. When comparing routes based on real-time data, RIP fails to work when utilizing fixed hop count criteria to choose the best routes. Because of the repeated processes, this generates packet loss and overloads network operations.
RIP Versions (V1 and V2) and RIPng
- RIP has a total of three versions:- RIP version 1, RIP version 2 and RIPng
- RIP version 1 which is the earliest version.
- Then came RIP version 2, which overcame some of the limitations of RIP version 1 and it is widely used in IPv4-based networks. However, it does not support IPv6.
- The latest RIP version is RIPng which stands for RIP Next Generation and it supports IPv6 address schema.
- By default, a Cisco router’s RIP process sends only RIPv1 messages but can listen to both RIPv1 and RIPv2 messages.
- The version 2 command under router rip enables RIP only to transmit and receive RIPv2 messages.
- RIPv2 is an updated version of RIP v1 with the additions listed below:
- Variable Length Subnet masks
- Authentication for routing updates
- Next-hop addresses
- External route tags
- Multicast route updates
RIP Features – Updates Types
– Broadcast Updates
- Is RIPv1’s default.
- Broadcast Updates With RIPv2, broadcast update transmission is optional.
- If required, then you can use the command “ip rip v2-broadcast” to enable broadcast at the interface level for RIPv2.
– Multicast Updates
- Multicast is the default for RIPv2 with the IP address 224.0.0.9.
- RIPv2 is enabled if you type “version 2.” inside router rip command mode.
– Unicast Updates
- Are optional in RIPv1 and RIPv2.
- Unicast Updates Are enabled using “neighbor ip” within the RIP protocol.
- Useful on NBMA networks like frame-relay
- Unicast updates do not prevent the transmission of broadcast or multicast packets. To accomplish this, configure a “Passive-interface.”
RIP Features – Metrics and Timers
Hop-count is used as a metric by RIP.
- 1 hop for each interface
- 16 hops = unreachable.
RIP Timers:-
- Update timer (30 sec) – On average, a router transmits a response message from each RIP-enabled interface every 30 seconds.
- Invalid timer (180 seconds) – The duration of a route can remain in the routing table without being updated.
- Holddown (180 sec) – A route will be placed in hold down if an update with a hop count greater than the metric indicated in the database is applied.
- Flush timer (240 seconds) – The amount of time that passes before an invalid route is erased from the routing table. – Before the expiration of the flush timeout, the invalid route will be announced with the inaccessible metric. – Displays in the routing table as “x.x.x.x may be down.”
- Sleeptime – A delay in milliseconds that is used to delay triggered updates. It must be less than the timer for the update.
Configuration Commands:-
- timers basic {update} {invalid} {holddown} {flush} [sleep] –> You can use this command to change the default RIP timers.
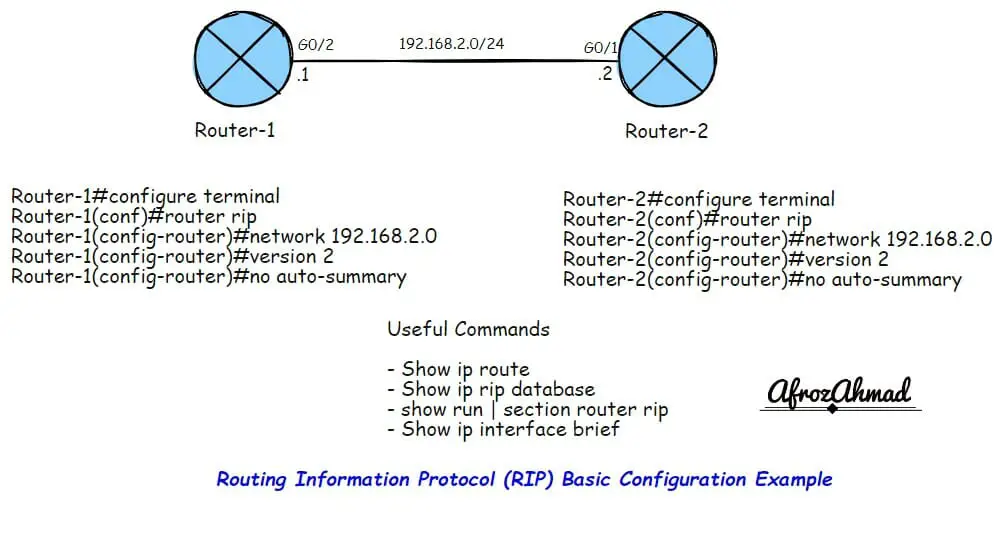
RIP Basic Configuration – Network Statement and Passive Interface
Some key points:-
- Even with RIPv2, a RIP network statement has no mask option and assumes classful boundaries.
- The subnet masks are taken from the interface on which the “network” address is set up and used in the updates sent to neighbors.
Configuration Commands:-
- router rip
- network {ip} – Specifies matched interfaces to be advertised by RIP
Passive Interface:-
- The “Passive interface” can be used with other routing protocols as well.
- It stops updates (response. msg – check with debug ip rip) from being sent out of the interface where it is enabled.
- The router will still listen for RIP updates, and when it gets a response update message on the Passive interface, it will change its routing table to reflect this.
- The router will still advertise to other peers about that interface address when it sends normal updates.
- Add the “passive-interface” command to the “neighbor” command in the RIP process to stop sending broadcast and multicast updates and only send unicast updates to a neighbor.
Configuration Commands:-
router rip
passive-interface default – This command will disable sending of RIP updates on all interfaces.
passive-interface [interface]
This command has the following effects:-
- Stops sending updates out of the specified interface
- Continues to receive updates and populates the routing table
- Continues to advertise that interface in normal updates to other peers
RIP Split Horizon
– RIP makes use of split-horizon with poison reverse and triggered updates.
Split Horizon:-
- Updates received in an interface are not transmitted out the same interface.
- This may be problematic on partial mesh NBMA networks, such as multipoint interfaces.
- It is enabled by default on all interfaces except main physical interfaces in frame-relay, which are disabled by default.
Configuration Commands:-
interface FastEthernet0/0
no ip split-horizon – This will disable split-horizon
RIP Triggered Updates
– RIP Triggered Updates
- A triggered update occurs anytime a route’s metric changes and, unlike regular updates, it includes only the altered entries.
- When a triggered update is received, the receiving router does not reset its update timer.
- When a triggered update is received, the receiving router does not reset its update timer.
- The “ip rip triggered” command enables RIP’s triggered extensions. It is required on both ends of a link.
- Route table updates are limited to the initial exchange of route tables and updates when the route tables change.
- The triggered state progresses from DOWN to INIT to LOADING to FULL.
- You can only configure a point-to-point serial link with this command.
Configuration Commands:-
interface Serial0/0
ip rip triggered –> Enabled triggered updates – Only available on serial links and works if enabled on both sides of the link. Check with your router vendor and release documents for support.
RIP Summarization
Auto-summarization is enabled by default in RIP.
RIP summarization has the following limitations:
- Only one major network summary is permitted per interface. Also, you cannot summarise beyond the main network. A summary of 10.0.0.0/6, for example, is not permitted.
- When doing manual summarization, you should turn off auto-summarization.
- A classful routing protocol is defined by the fact that it doesn’t advertise an address mask along with the destination address.
For each packet that passes through the router:
- Suppose the destination address belongs to a directly linked major network. In that case, RIP will utilize the subnet mask defined on the interface connected to that network to determine the destination address’s subnet. As a result, the same subnet mask must be utilized consistently across the entire major network.
- If the destination address does not belong to a directly linked major network, the router will attempt to match only the address’s major class A, B, or C portion.
Configuration Commands:-
interface fa0/0
ip summary-address rip {ip} {mask} – Limits the advertisements out of that interface to ONLY the summary – A subnet of the aggregate must be in the RIP database
RIP Filtering
- To filter traffic inside RIP, you can configure distribute-lists, offset-lists, and the “distance” command.
- Like the distribute-list/ACL example below, inbound filtering can be source-based.
- If the subnet mask must be matched, use prefix lists instead.
- An “offset list” can be used to change the metric, but only by increasing it. You can never reduce the metric.
- By setting the metric to unreachable, an “offset list” can also be utilized to filter traffic.
- Access-list 0′ corresponds to all routes.
- If no interface is found, the list will modify all incoming and outgoing updates on any interface provided by the access list.
- If no Access-list is called (by specifying zero as the access list number), the offset list will change all incoming and outgoing updates.
Configuration Commands:-
router rip
offset-list [acl] {in|out} {offset} {interface} –> This command will increase the RIP metric by the offset number specified..
distribute-list {acl | prefix} {in|out} –> This command will filter all routes matching a ACL or prefix-list.
distribute-list gateway {prefix-list} {in|out} {interface} –> This command will filter all routers to/from a neighbor.
distribute-list prefix {prefix-routes} gateway {prefix-source} {in|out} –> This command will filter prefixes from a specific source, and those routes will not be installed in the routing table.
distance {ad} {src-ip [mask]} [acl] –> If you set the distance to 255, all matching routers in the specified ACL will be filtered.
RIP Authentication Support
- RIPv1 does not support Authentication.
- RIPv2 only supports Authentication.
- It supports plain text as well as MD5.
- It is configured through key chains.
- RIPv2, unlike EIGRP, does not require both sides to have the same key number.
- When configuring, operation order is crucial. So make sure that you follow the steps mentioned below.
- Before making modifications to the key-chain, delete the interface’s configuration.
– Steps involved:
- The first step is to create the key chain with a name.
- Provide the key or keys inside the key chain.
- Specify the password referred to as ‘key-string.’
- Then you have to enable the Authentication on the interface and specify the key-chain to be used.
- Then the last step is to specify whether the interfaces will use clear text or MD5. If not specified, clear is used.
Configuration Commands:-
key chain KEY-CHAIN –> Step1 – Provide a name of a key chain
key 1 –> Step2 – Provide a key number inside key chain
key-string KEY-SECRET –> Step3 – Provide a key-string
interface eth0
ip rip authentication key-chain KEY-CHAIN –> Step4 – Use key-chain name as KEY-CHAIN to enable Authentication on an interface.
ip rip authentication mode md5 –> Step5 – Choose authentication mode as md5.
sh ip protocols | begin rip – Check if correct key-chain is in use.
Conclusion
Now you have a basic to advance level of understanding of RIP version 1 and 2, their features, and how it works. It is worth noting that the RIP was designed to be a good choice for small networks which do not require advanced features. I would rather suggest you start with OSPF or IS-IS if you foresee substantial network growth in the future.
- pfSense 10G Home Lab Setup: Complete Hardware Guide (2026) - April 1, 2026
- Best Budget Home Lab Setup Under $300 (2026): Complete Starter Stack - March 30, 2026
- Best Modems for Spectrum: Top DOCSIS 3.1 Picks That Actually Work - March 28, 2026