Resetting your CenturyLink modem/router can help resolve a lot of connectivity issues and get your internet back up and running. This comprehensive guide will walk you through the entire process of resetting a CenturyLink modem via two easy methods.
Quick Note
Before considering a modem reset, it’s always worth doing a simple reboot first by unplugging the power cord of the modem and plug back in after 1 minute. If you’ve already tried rebooting and your internet isn’t working, you might consider a factory reset.
Resetting your modem will erase any customized settings, including personalized passwords, WiFi settings, routing, and DHCP settings.
Jump to :
Key Takeaways
🔄 The reset process restores the device to its original factory settings, erasing all custom configurations.
🔑 It’s important to backup your modem’s settings if you wish to retain any personalized configurations.
🕒 The reset process typically takes 3-5 minutes, during which your internet connection will be interrupted.
🚫 After a reset, all devices connected to your network will need to be reconnected.
🖱️ Two methods for resetting: using the reset button or through the admin interface.
📶 Post-reset, you’ll need to reconfigure your WiFi network and any other custom settings.
📞 Persistent issues after a reset may require contacting CenturyLink customer support for further assistance.
🛠️ Always backup your modem’s configuration before initiating a reset to ensure you can restore any important settings.
When Should You Reset Your CenturyLink Modem/Router?
Before we get into the step-by-step instructions, let’s first understand when you should reset your device.
Resetting and restoring factory default settings on your CenturyLink modem/router is recommended if you are facing any of these issues:
- Internet connectivity problems
- Slow WiFi speeds
- Unable to access modem admin interface
- Experiencing intermittent connection losses
- Modem frequently reboots on its own
- Seeing blinking lights on your modem
- Device has old settings and configurations
- Want to set up fresh WiFi network settings
Resetting eliminates any misconfigurations or temporary glitches that may be causing problems. It restores your device to original factory condition so you can start from scratch.
However, remember that a reset will erase all custom settings you may have configured like WiFi SSID, WiFi password, port forwarding rules, firewall settings, etc. So if you want to retain any personalized settings, make sure to back up the configuration before initiating a factory reset.
See also:
What You Should Know Before Resetting
- The entire reset process usually takes 3-5 minutes to complete.
- Your CenturyLink modem/router will reboot during the reset process. You may experience brief internet interruption during this time.
- All devices connected to your home network will be disconnected after the reset. You’ll have to reconnect every WiFi device.
- Make a note of your existing WiFi network name (SSID) and WiFi password if you need to restore them later.
- Backup configuration file from the modem admin interface if you have any custom settings that you want to retain post reset.
- If issues persist even after resetting modem, contact CenturyLink customer support. You may need a replacement.
Okay, now that you know when and why you should reset your CenturyLink modem, let me walk you through the step-by-step process.
Method 1 – Reset Using The Reset Button
Resetting your CenturyLink modem via the reset button is super easy and can be done without logging into the admin interface.
Here is how to factory reset a CenturyLink modem/router via the reset button:
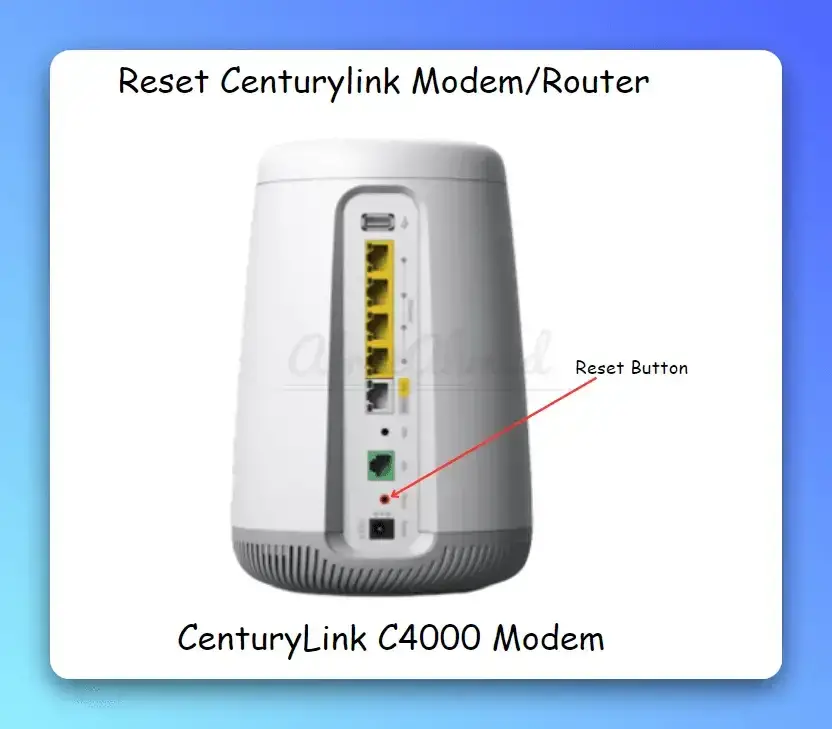
Step 1: Locate The Reset Button
The reset button is a small recessed button, usually red in color, located at the back or bottom of your CenturyLink modem/router.
It is typically labeled as Reset. Refer to the model sticker on your device to identify the reset button.

Reset button on the C4000 modem
Step 2: Press And Hold The Reset Button
With your CenturyLink modem powered on, use a paper clip or pen tip to press and hold the reset button.
Hold for approximately 10 seconds until the power light blinks amber/orange.
When you feel a click sound, keep the button pressed for another 5-8 seconds before releasing.
Step 3: Wait For Modem To Reset
It will take 3-5 minutes for the reset to fully complete. The power light will continuously blink during this period.
Once done, the modem will automatically reboot and power light will turn green indicating internet connectivity is restored.
Step 4: Reconfigure Your WiFi Network
Post reset, your existing WiFi settings like network name, password, security protocols will be lost.
You will have to:
- Connect devices to the new default WiFi network credentials printed on the modem sticker.
- Access modem admin interface to reconfigure new personalized WiFi settings, parental controls, etc.
That’s it! You have successfully reset your CenturyLink modem/router to factory default settings using the reset button.
See also: How to Cancel CenturyLink Service
Method 2 – Reset Through Admin Interface
If you want better control over the reset process, use the admin interface:
Step 1: Log Into Modem Admin Interface
Open web browser and enter the default gateway IP address printed on your CenturyLink modem sticker:
Finding default gateway IP on CenturyLink modem
Enter username/password when prompted. Default credentials:
- Username: admin
- Password: Use the password printed on the modem sticker.
Step 2: Navigate To Reset Option
Go to Utilities > Reset Options
Alternatively, visit Administration > Factory Reset
Reset option in CenturyLink modem settings
Step 3: Select Reset Option
Select appropriate reset option:
- “Restore Modem to Factory Default State” – To erase all user-defined settings
- “Restore WLAN Settings to Factory Default” – To only reset WiFi settings
Step 4: Let Modem Reboot and Reset
The power light will blink for 3-5 minutes when resetting. Wait for the process to fully complete.
Step 5: Reconfigure Network Post Reset
Similar to the reset button method, you will have to:
- Reconnect WiFi devices using updated network credentials
- Restore any backed up router settings
- Personalize WiFi network settings from scratch
And you have successfully factory reset your CenturyLink modem via the admin interface!
Final Thoughts
- Reset eliminates any misconfigurations and temporarily stored glitches
- Helps resolve various connectivity and performance issues
- Restores modem to original factory settings
However, resetting erases all customized settings. So remember to always backup your configuration before initiating a factory reset on CenturyLink modem.
I hope this detailed guide on how to properly reset your CenturyLink modem/router helped resolve any internet connectivity problems you may have been facing!
Frequently Asked Questions
Here are some common queries regarding resetting CenturyLink modem/router:
1. Why is my CenturyLink modem blinking blue or orange light?
Blinking lights, usually blue or amber/orange, indicate that the modem reboot or reset process is underway. Wait for 3-5 minutes for the lights to turn solid green, marking completion.
2. How to find CenturyLink modem admin password?
The default modem admin login credentials are:
- Username: admin
- Password: Printed on the modem sticker
3. Can I backup CenturyLink modem settings?
Yes, you can download and save the modem configuration file before resetting. Post reset, upload this file to restore your custom settings.
4. How to change WiFi password on CenturyLink modem?
After resetting to default factory settings, simply access the admin interface and update wireless security protocols and WiFi password as desired under Basic Settings > Wireless tab.
5. Why is my CenturyLink internet light red?
A solid red internet light indicates loss of connectivity. Try rebooting your modem first. If issues persist, reset your modem to factory defaults.
- Telecom Network Infrastructure: Complete Guide to Components & Design - January 6, 2026
- TP-Link TL-SG108E vs Netgear GS308E: Budget Smart Switches - January 5, 2026
- MikroTik CRS305-1G-4S+ Review: The Ultimate Budget SFP+ Switch Guide - December 25, 2025


