Ah, 802.1X authentication – a true veteran in network security, often affectionately (or sometimes exasperatedly) known as Dot1x. I remember configuring my first Dot1x setup way back in the day, and it felt like unlocking a new level of control for network access. Fast forward to today, and while the core principles remain steadfast, the surrounding landscape of network security, automation, and operational best practices has evolved dramatically. It’s no longer just about getting it to work; it’s about making it resilient, scalable, and automated.
Back when I first wrote about this, it was a cool new feature. Now, it’s a fundamental building block of any robust access layer security strategy, especially when integrated with modern Network Access Control (NAC) solutions and a Zero Trust philosophy. So, let’s dive back in, revisit the foundations, and then explore how Dot1x fits into our automated, secure networks of today and tomorrow.
The Enduring Core of 802.1X: Supplicant, Authenticator, Server
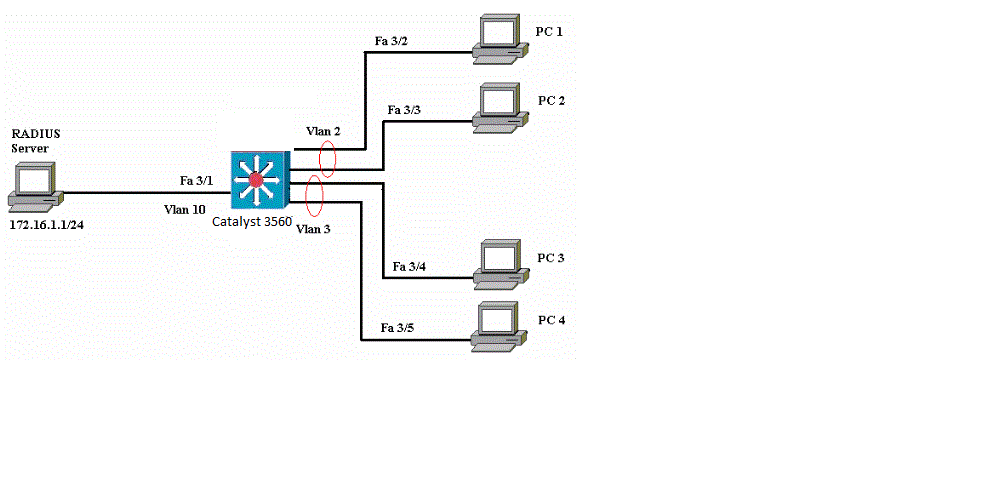
The beauty of Dot1x lies in its simple, yet powerful, three-part architecture:
- Supplicant: This is the client device (your laptop, IP phone, printer, IoT device) requesting access to the network. It runs 802.1X client software (like Windows native client, supplicant for Linux, or embedded in device firmware).
- Authenticator: This is the network device that the supplicant connects to – typically an access layer switch. It acts as a gatekeeper, relaying authentication requests between the supplicant and the authentication server.
- Authentication Server: The brain behind the operation, usually a RADIUS (Remote Authentication Dial-In User Service) server. It holds the authentication credentials (username/password, certificates) and policies, determining if a supplicant is allowed onto the network and, if so, what level of access it should have (e.g., assigning a specific VLAN or access control list). While TACACS+ is excellent for device administration, RADIUS is the go-to protocol for 802.1X user/device authentication.
This fundamental model remains crucial. However, the sophistication of the authentication server and the dynamic policies it can enforce have grown exponentially.
Configuring 802.1X on Modern Cisco IOS XE Switches
Let’s walk through the configuration steps, focusing on current Cisco IOS XE syntax and best practices. While the old IOS 12.x commands laid the groundwork, modern switches offer enhanced capabilities and slightly refined CLI.
1. Enable AAA Globally
First and foremost, Authentication, Authorization, and Accounting (AAA) must be enabled. This is still done with the tried-and-true global command:
aaa new-model2. Configure AAA Authentication Methods
Next, we tell the switch how to authenticate users and devices. For 802.1X, we typically leverage a RADIUS server. We’ll set a default for login and a specific method for dot1x:
aaa authentication login default local
aaa authentication dot1x default group radius
Here, aaa authentication login default local ensures that if your RADIUS server is unreachable, you can still log into the switch locally. For 802.1X, we explicitly tell it to use the radius group.
3. Define Your RADIUS Server(s)
Now, let’s point the switch to your RADIUS server. In a production environment, you’d typically configure primary and secondary servers for redundancy. Remember to use a strong, shared key!
radius server RADIUS-SERVER-1
 address ipv4 192.168.10.10 auth-port 1812 acct-port 1813
 key YourSuperSecretRADIUSKey!

radius server RADIUS-SERVER-2
 address ipv4 192.168.10.11 auth-port 1812 acct-port 1813
 key YourSuperSecretRADIUSKey!

aaa group server radius RADIUS_GROUP
 server name RADIUS-SERVER-1
 server name RADIUS-SERVER-2
It’s also good practice to define a source interface for RADIUS packets, ensuring they always originate from a predictable IP address:
ip radius source-interface Vlan100This helps with firewall rules and consistent communication with the RADIUS server.
4. Enable 802.1X Globally
Just like before, we need to enable the 802.1X feature globally on the switch:
dot1x system-auth-controlThis command remains a prerequisite on modern IOS XE platforms to enable per-port 802.1X functionality.
5. Configure 802.1X on the Interface
This is where things got a bit tricky in earlier IOS versions, and it’s important to use the current syntax for consistency. Navigate to the access port(s) where clients will connect:
interface GigabitEthernet1/0/1
 switchport mode access
 switchport access vlan 20
 authentication port-control auto
 authentication host-mode multi-domain
 authentication violation restrict
 dot1x pae authenticator
switchport mode access: Required for 802.1X on access ports.switchport access vlan 20: This is the initial VLAN for unauthenticated or failed authentication. In a modern setup with a NAC like Cisco ISE, this is often a “guest” or “quarantine” VLAN, with the RADIUS server dynamically assigning the correct VLAN upon successful authentication.authentication port-control auto: This is the key command, telling the port to initiate 802.1X authentication. Note that the originaldot1x port-control autois deprecated, andauthentication port-control autois the current and preferred command across Cisco Catalyst and IOS XE platforms.authentication host-mode multi-domain: This is powerful! It allows both a voice VLAN (for an IP phone) and a data VLAN (for a PC connected to the phone) on a single port, authenticating each separately. Other modes includesingle-host(only one MAC allowed),multi-auth(multiple hosts, each authenticated), andmulti-host(first host authenticates, others get free pass).authentication violation restrict: If authentication fails or a violation occurs, the port remains in the unauthorized state, and a syslog message is generated.dot1x pae authenticator: Explicitly sets the port role as an authenticator.
6. Verification Commands
To check your configuration and active sessions:
show dot1x all
show aaa servers
show authentication sessions
show authentication sessions interface GigabitEthernet1/0/1 details
Beyond Basic Dot1x: The Modern Landscape
While the CLI commands get the job done, modern network environments demand more than just static 802.1X. This is where Network Access Control (NAC) solutions, Zero Trust principles, and automation come into play.
Network Access Control (NAC) Solutions (e.g., Cisco ISE)
Integrating 802.1X with a robust NAC solution like Cisco Identity Services Engine (ISE) transforms it from a simple on/off switch to a dynamic, context-aware security enforcer. ISE allows you to:
- Profile Devices: Automatically identify what kind of device is connecting (laptop, IP phone, printer, IoT sensor).
- Posture Assessment: Check device health (antivirus up-to-date, firewall enabled, OS patches).
- Dynamic VLAN Assignment: Based on user identity, device type, and posture, assign devices to the correct VLAN and apply specific Access Control Lists (ACLs). This is significantly more scalable than static VLAN assignments.
- Guest Access: Provide captive portal for guest registration.
- Centralized Policy Management: Manage all access policies from a single pane of glass.
- Integration with SD-Access and TrustSec: Enable advanced microsegmentation and policy enforcement across the network.
Zero Trust and 802.1X
In a Zero Trust architecture, we “never trust, always verify.” 802.1X is a critical enabler for this at the access layer. Every device, every user, must authenticate and be authorized before gaining network access, regardless of location. Combined with device profiling and posture, Dot1x helps ensure that only known, healthy devices can even attempt to connect, aligning perfectly with Zero Trust principles.
Infrastructure as Code (IaC) and Automation for 802.1X
Manually configuring Dot1x on dozens or hundreds of access ports is tedious and prone to errors. This is where network automation shines. Tools like Ansible, Python (with Netmiko/Nornir/Scrapli), and Terraform can standardize and accelerate your deployments.
Ansible Example (Using `cisco.ios` Collection)
An Ansible playbook can configure 802.1X across many switches consistently:
---
- name: Configure 802.1X on Cisco IOS XE Switches
  hosts: cisco_switches
  gather_facts: false
  connection: network_cli

  tasks:
    - name: Enable AAA new-model
      cisco.ios.ios_config:
        lines:
          - "aaa new-model"

    - name: Configure AAA authentication for 802.1X
      cisco.ios.ios_config:
        lines:
          - "aaa authentication login default local"
          - "aaa authentication dot1x default group RADIUS_GROUP"

    - name: Configure RADIUS servers
      cisco.ios.ios_config:
        lines:
          - "radius server RADIUS-SERVER-1"
          - " address ipv4 192.168.10.10 auth-port 1812 acct-port 1813"
          - " key {{ radius_key }}"
          - "radius server RADIUS-SERVER-2"
          - " address ipv4 192.168.10.11 auth-port 1812 acct-port 1813"
          - " key {{ radius_key }}"
          - "aaa group server radius RADIUS_GROUP"
          - " server name RADIUS-SERVER-1"
          - " server name RADIUS-SERVER-2"
          - "ip radius source-interface Vlan100"

    - name: Enable global dot1x system-auth-control
      cisco.ios.ios_config:
        lines:
          - "dot1x system-auth-control"

    - name: Configure 802.1X on access interfaces
      cisco.ios.ios_interfaces:
        config:
          - name: GigabitEthernet1/0/{{ item }}
            description: "802.1X Enabled Access Port"
            enabled: true
            switchport:
              mode: access
              access_vlan: 20
            auth:
              port_control: auto
              host_mode: multi-domain
              violation: restrict
              dot1x_pae: authenticator
      loop: "{{ access_ports }}"
      vars:
        access_ports: [1, 2, 3, 4] # Example: configure Gi1/0/1 to Gi1/0/4
Python Example (Netmiko/Nornir for configuration, Scrapli for validation)
Python scripts offer granular control. Here’s a snippet demonstrating configuration and verification:
from nornir import InitNornir
from nornir_scrapli.tasks import send_configs, send_command
from nornir_utils.plugins.functions import print_result
import getpass

# Initialize Nornir
nr = InitNornir(config_file="config.yaml") # Assumes a Nornir config.yaml

# Add credentials dynamically (or from environment variables)
password = getpass.getpass("Enter password: ")
nr.inventory.defaults.password = password

# Define 802.1X configuration commands
dot1x_config = [
    "aaa new-model",
    "aaa authentication login default local",
    "aaa authentication dot1x default group RADIUS_GROUP",
    "radius server RADIUS-SERVER-1",
    " address ipv4 192.168.10.10 auth-port 1812 acct-port 1813",
    " key YourSuperSecretRADIUSKey!",
    "radius server RADIUS-SERVER-2",
    " address ipv4 192.168.10.11 auth-port 1812 acct-port 1813",
    " key YourSuperSecretRADIUSKey!",
    "aaa group server radius RADIUS_GROUP",
    " server name RADIUS-SERVER-1",
    " server name RADIUS-SERVER-2",
    "ip radius source-interface Vlan100",
    "dot1x system-auth-control",
]

# Define interface configurations
interface_configs = []
for i in range(1, 5): # For Gi1/0/1 to Gi1/0/4
    interface_configs.extend([
        f"interface GigabitEthernet1/0/{i}",
        " switchport mode access",
        " switchport access vlan 20",
        " authentication port-control auto",
        " authentication host-mode multi-domain",
        " authentication violation restrict",
        " dot1x pae authenticator",
        "exit"
    ])

# Combine all configurations
full_config = dot1x_config + interface_configs

# Send configurations
print("--- Applying 802.1X Configuration ---")
result_config = nr.run(task=send_configs, configs=full_config)
print_result(result_config)

# Verify configuration and state
print("\n--- Verifying 802.1X Configuration ---")
result_show = nr.run(task=send_command, command="show authentication sessions")
print_result(result_show)

result_dot1x = nr.run(task=send_command, command="show dot1x all")
print_result(result_dot1x)
Leveraging these tools allows you to manage 802.1X policies and configurations across your entire network, integrate with CI/CD pipelines, and practice GitOps for networking changes, making your network more secure and resilient.
Observability and Day-2 Operations
Once 802.1X is deployed, constant monitoring and validation are crucial. Modern observability platforms can ingest syslogs and SNMP traps from your switches and RADIUS server, providing real-time visibility into authentication successes, failures, and policy violations. Tools like Suzieq or custom Python scripts using Scrapli can periodically pull state information (`show authentication sessions`) to ensure compliance and troubleshoot issues proactively.
Conclusion: 802.1X – A Cornerstone, Not Just a Feature
From a “cool feature” in 2011 to a foundational component of modern network security, 802.1X authentication has truly matured. It’s no longer just about securing an individual port; it’s about integrating that port into a comprehensive security fabric, driven by identity, context, and policy. By combining the power of Dot1x with advanced NAC solutions, adopting Zero Trust principles, and embracing network automation, we can build networks that are not only secure but also agile and easy to manage. I’ve broken configs enough times to know that automation and robust validation are key to getting this right and keeping it right. So, go forth, secure your access layer, and automate like there’s no tomorrow!
- Telecom Network Infrastructure: Complete Guide to Components & Design - January 6, 2026
- TP-Link TL-SG108E vs Netgear GS308E: Budget Smart Switches - January 5, 2026
- MikroTik CRS305-1G-4S+ Review: The Ultimate Budget SFP+ Switch Guide - December 25, 2025


