What is OSPF Virtual Link, when to use it, and how to configure it?
An OSPF virtual link is a shortcut that allows an isolated OSPF area to connect to the backbone area 0. The virtual link helps network administrators extend their OSPF network while maintaining OSPF design requirements. In this article, we will discuss OSPF virtual link, when you should use it, requirements, key points, and how to configure it. As a bonus, we will also discuss an alternative option for the OSPF virtual link.
I recommend going through these posts to grasp the overall routing and OSPF concept.
What is Routing in Networking, and How does Routing work
What is a Routing table, explained with Show IP Route Command Cisco
Understanding Dynamic Routing Protocols Types
OSPF states Explained [with Infograhic]
What is a Virtual link in OSPF, and When to use it?
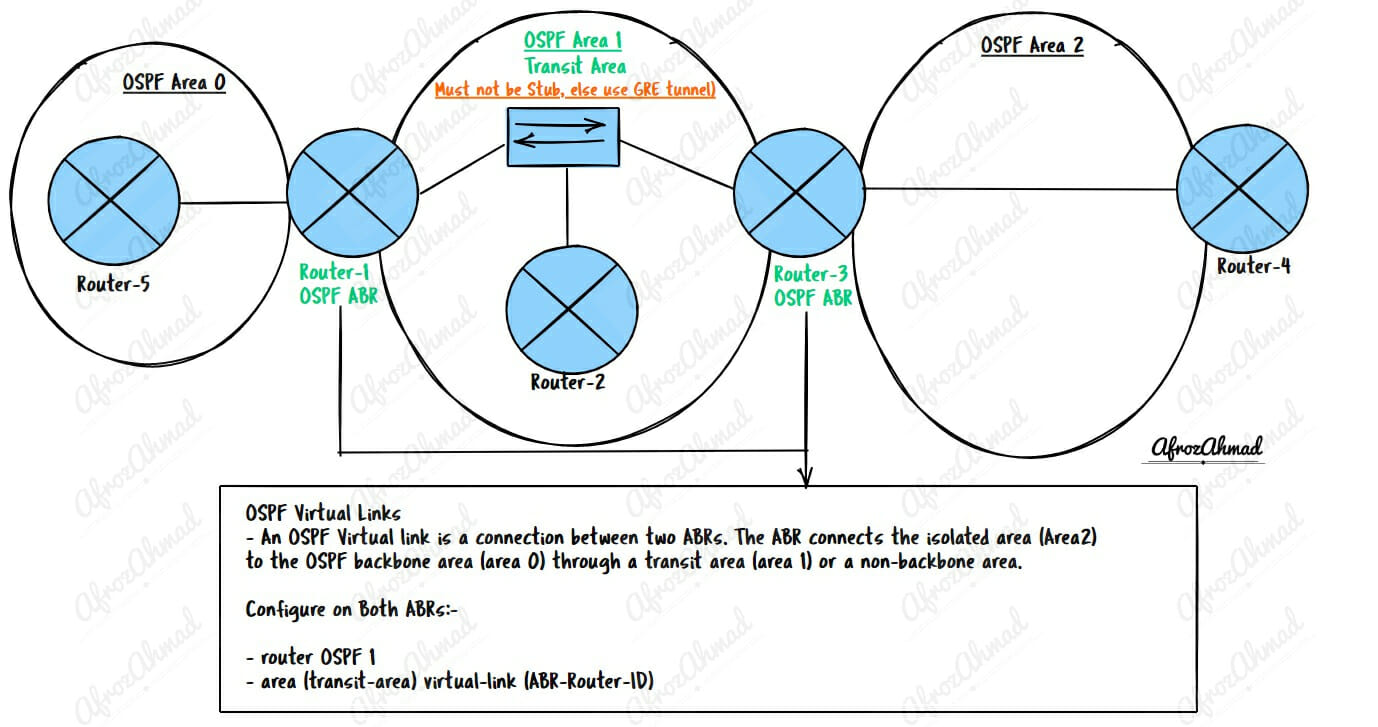
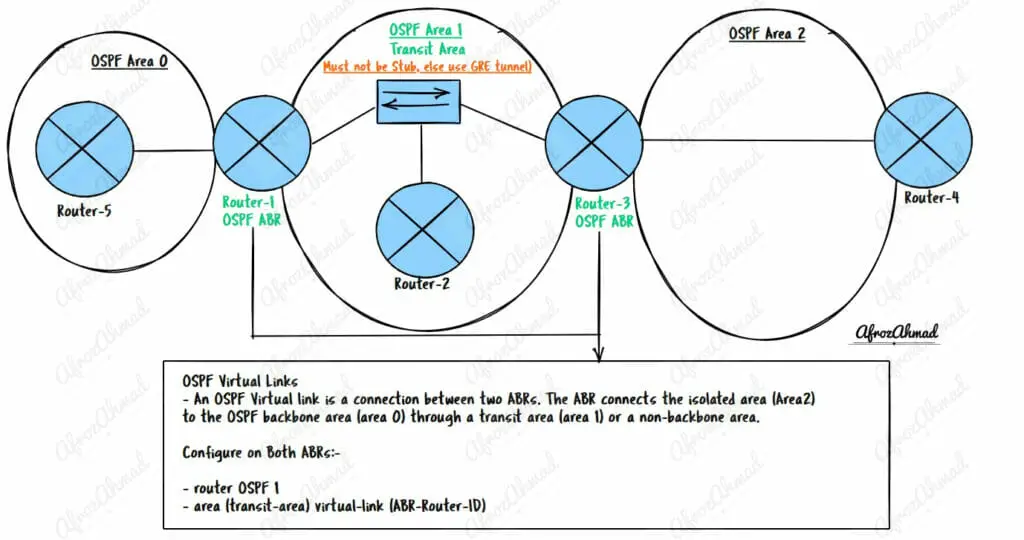
An OSPF virtual link is a connection between two ABRs. The ABR connects the isolated area to the OSPF backbone area 0 through a transit area or a non-backbone area.
This helps administrators extend their OSPF network while maintaining OSPF design requirements.
When to use a Virtual Link in Your Network?
There are several scenarios where you may want to use a virtual link in your network. The following are some examples:
- You want to connect an isolated OSPF area to the backbone area 0.
- To connect two parts of a partitioned backbone.
- To link an area to the backbone through a non-backbone area (also known as a transit area).
OSPF Virtual link Requirements
To configure a Virtual link in OSPF, you must meet the following requirements:
- Must be configured between two ABRs, of which one must be connected to area 0.
- The transit area may not be a stub area and must have full routing information.
- The virtual link will transition to the fully functional point-to-point interface state when a route to the neighboring ABR is found in the routing table.
- The maximum path cost in the transit area should not exceed 65535; else, the virtual link will not come up.
- To see the cost of using the transit area, “show ip OSPF virtual-link” and refer to ‘cost of using.
OSPF Virtual Link Key Points
There are several key points to consider when configuring a Virtual link:
- OSPF ignores subnet mask mismatch on point-to-point links.
- A virtual link is seen as an interface in area 0.
- All area 0 attributes are inherited by routers attached to the virtual link, including summarization and authentication.
- The cost of the virtual link is the cost of the route to the neighboring ABR interface via the transit area.
- Virtual-links are only used for control traffic, i .e. flooding Type- 1, Type-2, Type-3, and Type-4 OSPF LSAs. No traffic is sent over virtual links because it’s not a tunnel.
How To Configure OSPF Virtual Link?
Once you have identified the OSPF ABRs, you need to configure them using the below command on both ends:
router OSPF 1
area (transit-area) virtual-link (ABR-Router-ID) —> You need a similar command on the other ABR as well.
Alternative of OSPF Virtual Link
One of the major drawbacks of OSPF Virtual links is that OSPF virtual links cannot transit stub areas. If a virtual link over a stub area is required, then a GRE tunnel between ABRs is the only viable option.
OSPF over GRE works similarly to OSPF Virtual links. You have to make sure that the tunnel interface’s IP address must be advertised in area 0 and have a network statement in area 0.
Conclusion
In a nutshell, through OSPF virtual link, you connect an isolated OSPF area to the OSPF backbone area 0, and you must configure Virtual links on Area Border Routers.
Now that you have learned about the OSPF Virtual Link and its functionality, you are ready to begin configuring an OSPF Virtual link. In summary, there are three main steps:
Step 1: Identify an isolated area that needs to connect to area 0.
Step 2: Identify appropriate ABRs and make sure the above requirements are met.
Step 3: Configure under the OSPF process using the above command on both ABRs.
- pfSense 10G Home Lab Setup: Complete Hardware Guide (2026) - April 1, 2026
- Best Budget Home Lab Setup Under $300 (2026): Complete Starter Stack - March 30, 2026
- Best Modems for Spectrum: Top DOCSIS 3.1 Picks That Actually Work - March 28, 2026