Starlink is an innovative satellite internet service from SpaceX that provides high-speed, low-latency connectivity even in remote areas. By using a network of low Earth orbit satellites, Starlink can beam internet access down to their users anywhere.
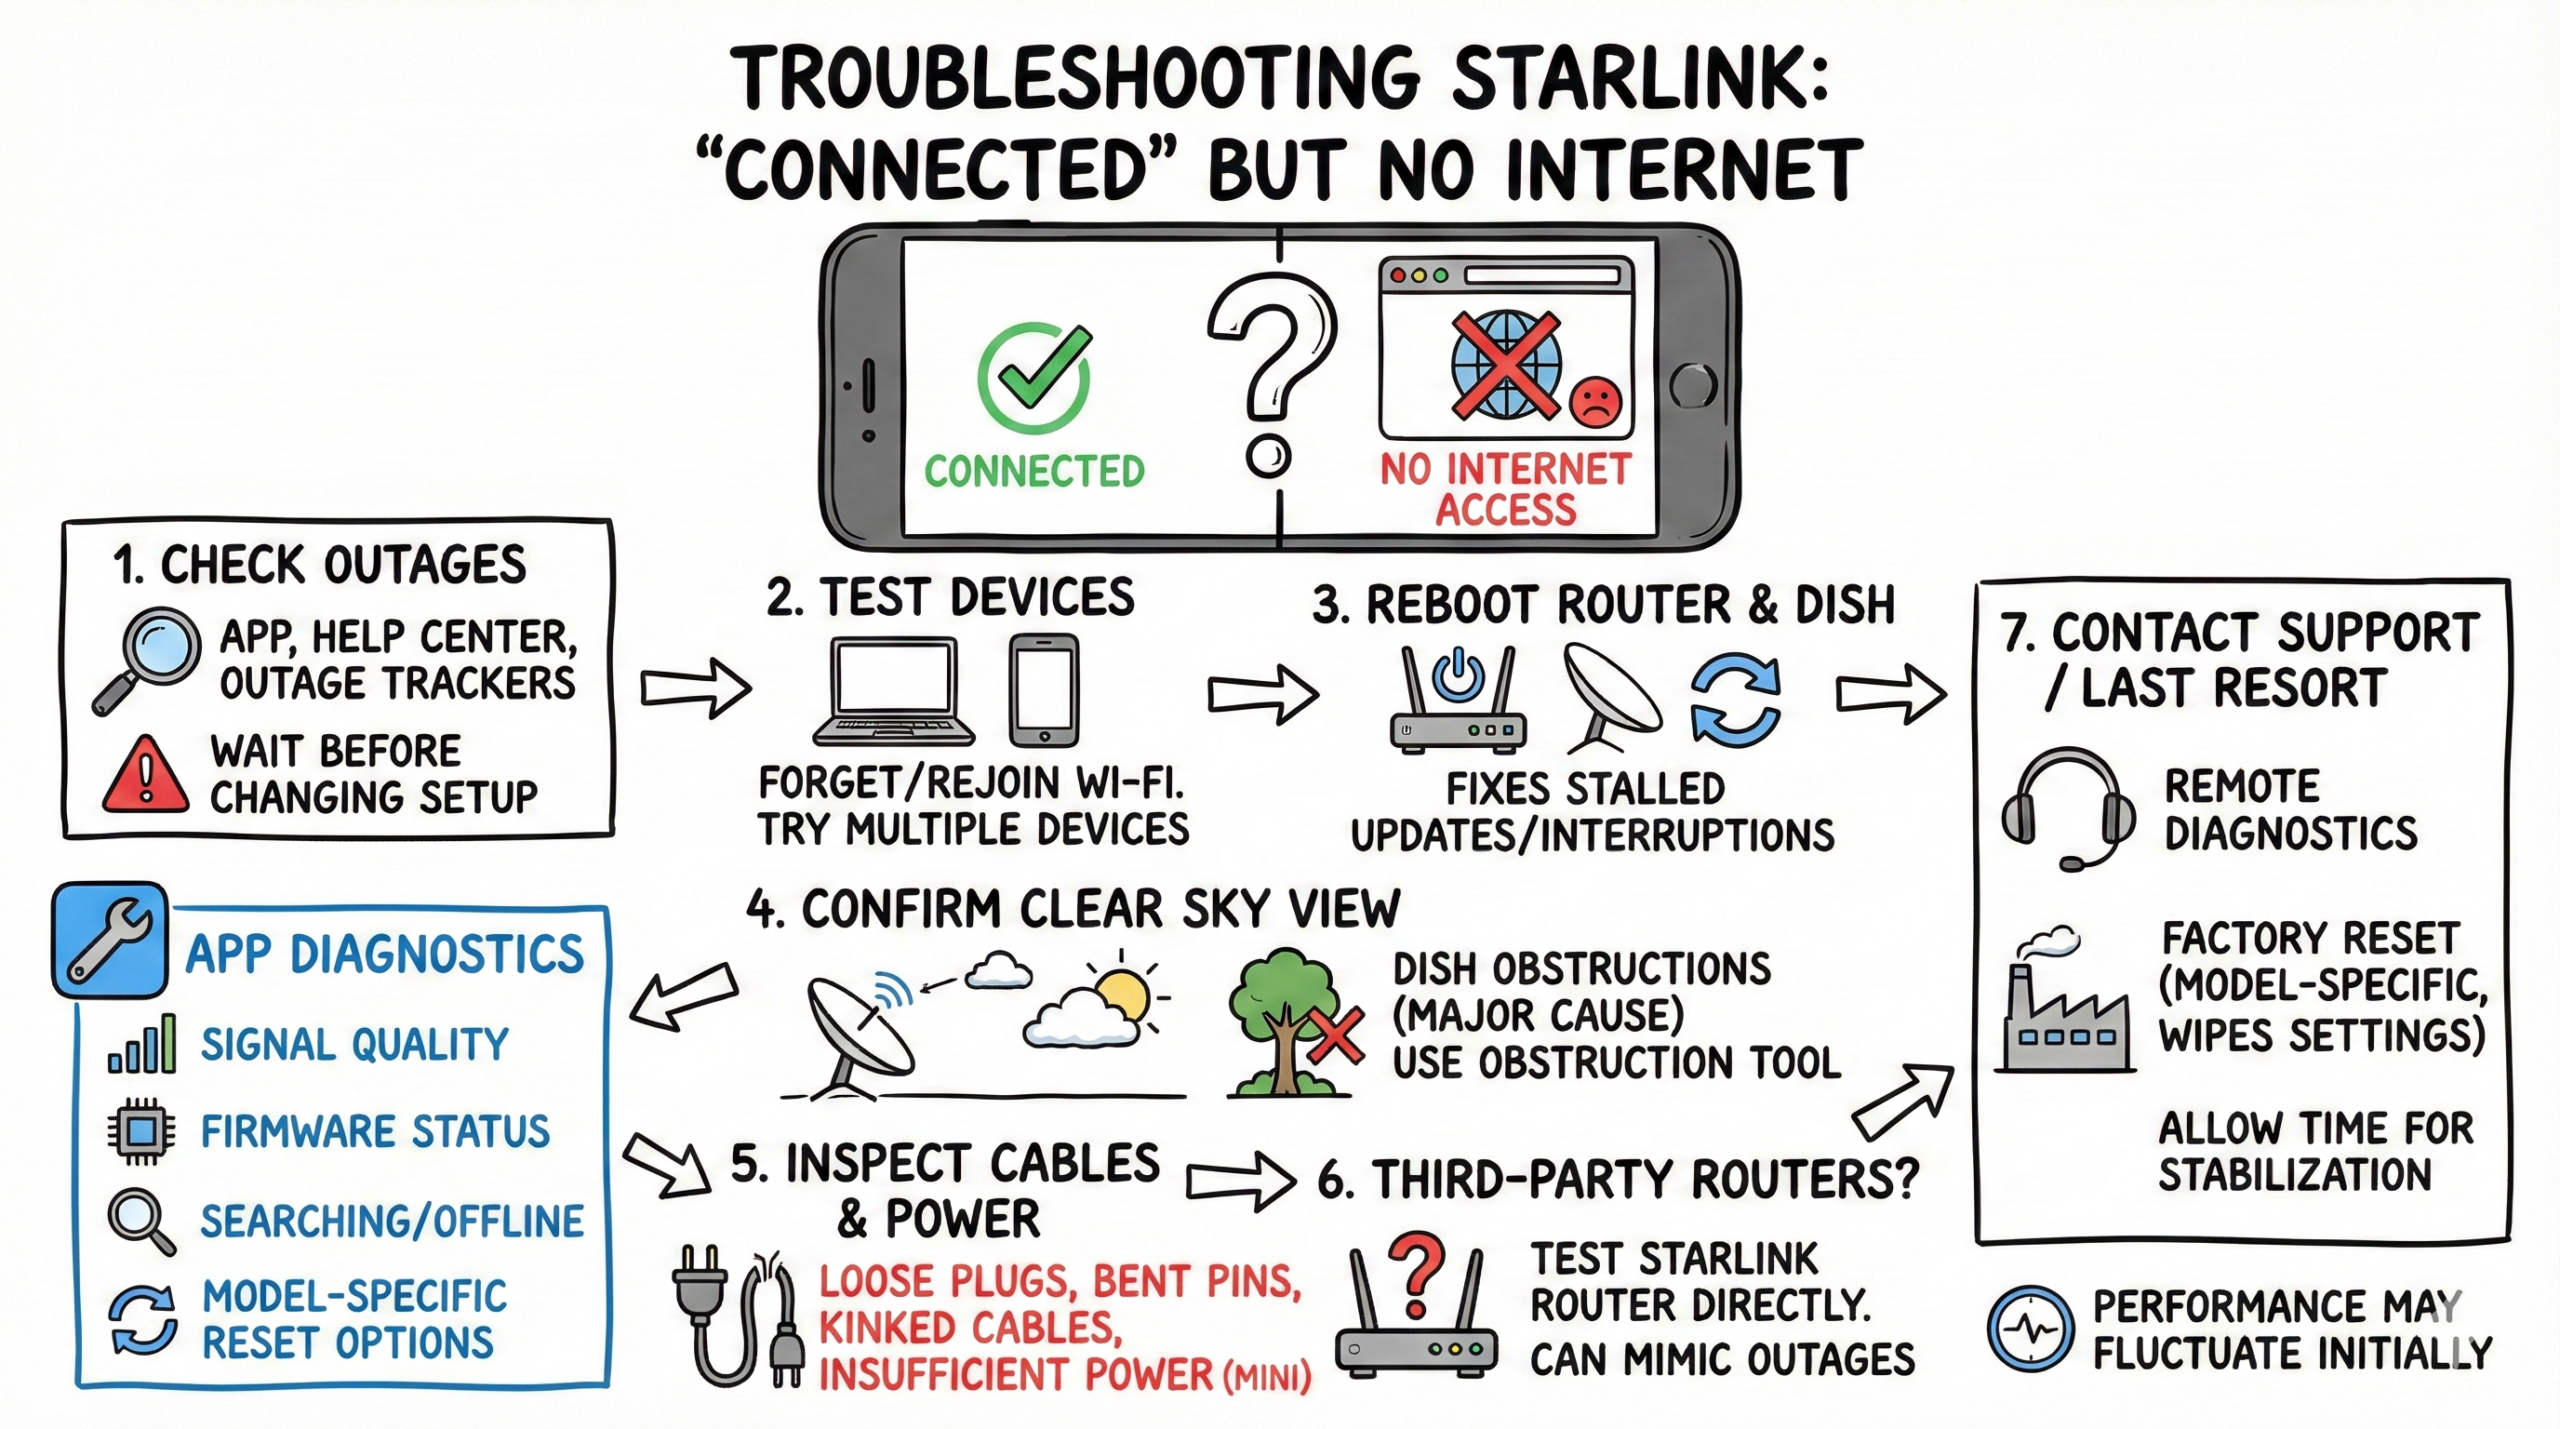
However, as with any technology, sometimes there can be hiccups. One of the more frustrating issues is when your Starlink app shows connected, but you can’t actually access the internet or any online services. If this happens, first confirm there is no wider outage, then reboot your router and dish, verify cables and power, and, if needed, perform a model-specific factory reset (Gen 2, Gen 3, or Mini) before contacting support.
This article will explore the various causes for this problem and actionable solutions you can try yourself to get back online. We’ll also provide some tips for improving your Starlink connection and what to do if all else fails. Let’s get started!
Why Starlink Might Show Connected With No Internet
When everything seems fine in your Starlink app but you have no internet connectivity, there are a few potential culprits to consider:
- Starlink Network Issues – Like any ISP, Starlink can experience occasional outages or network congestion that disrupts service. Checking official notices in the app or Help Center, and Starlink’s X account, can confirm if they are having issues.
- Software/Firmware Problems – The Starlink router and dish update automatically; sometimes an update can stall. A reboot or a model-appropriate factory reset typically resolves it. If the app offers an update, apply it; otherwise updates install automatically during maintenance windows.
- Hardware Issues – Damaged cables, loose connections, or a defective router/dish can prevent internet signal from transmitting properly.
- Dish Placement Problems – Obstructions blocking dish view of satellites or a poor location can cause intermittent or no signal. Standard actuated kits self‑orient, but they still require a clear view of the sky.
- Outside Coverage Area – Trying to use Starlink outside of their active service regions will not work. Check their coverage map.
- Account/Subscription Problems – Issues with account status or an inactive subscription can also cause connection problems.
If you are encountering the connected without internet problem, don’t worry – the solutions below should help identify and resolve the fault.
Troubleshooting When Starlink is Connected But No Internet
If your Starlink is connected but you still have no internet access, try these troubleshooting steps:
Check Whether Your Device Is To Blame First
Ensure that your device has its WiFi turned on and is not faulty. If the router checks out OK, try switching to another device to see if it has internet access before assuming your Starlink is to blame. If one device is offline but others work, clear that device’s network settings, forget and rejoin the Wi‑Fi, or test with Ethernet if available.
Check for Starlink Service Outages
The first step is verifying if the issue is actually on your end or if Starlink is having network problems.
- Check for notices in the Starlink app or Help Center. Starlink also posts important service updates on its official X account.
- Cross‑check third-party outage trackers like DownDetector to see if others nearby are reporting issues.
- If there are no reported issues, the problem likely lies with your local setup rather than Starlink’s network.
- If there is an outage, wait for Starlink to resolve it on their end and use a backup internet source if possible.
Check for Obstructions
Dish obstructions can significantly impact your Starlink internet service. Use the Starlink app to check for obstructions and ensure your dish has a clear line of sight. The app can help you monitor your internet connection, signal strength, internet speed, and network activity. Standard actuated kits self‑orient, so you typically won’t need to adjust the angle manually; just ensure a clear sky view with no red areas on the obstruction map.
Reboot Your Starlink Router & Dish
A clean reboot resolves many connectivity interruptions. Use the app whenever possible for the most reliable restart.
To properly reboot and refresh the system:
- Router: Use the app to initiate a reboot (tap the status message if prompted, or go to Settings > Router > Reboot). If power cycling, unplug for about 60 seconds, then plug back in and allow 5–10 minutes to fully initialize.
- Dish: In the app, go to Settings > Starlink > Reboot Starlink to restart the antenna.
After rebooting, wait a few minutes for the app to show “Online” and for speeds to stabilize before retesting.
Inspect All Hardware Connections
While Starlink self-updates and runs automatic checks, problems can still happen randomly with the physical gear:
- Carefully check dish cable connections for any damage or loose plugs at dish and router ends. Faults like bent pins or poor weather seals cause problems.
- Verify dish cable did not get crimped or bent sharply anywhere along its run. Don’t let it kink over roof edges or in windows/doors. Replace if damaged sections found.
- Make sure to fully seat connectors, firmly pushing until their retention clips click and lock. Loose connections can prevent signal transmission.
- Inspect router power cord and Ethernet ports. Verify router firmware in the app; apply an update if the app offers one—otherwise updates are automatic.
- If you use a 3rd party router instead, try temporary direct Starlink router hookup to narrow down source of issues.
- Check WiFi devices have good signal strength to router if wireless connected. Weak reception causes drops. If using Starlink Mini, ensure the power source supports USB‑C PD up to 100W (20V/5A) to avoid brownouts that appear as “connected, no internet.”
Fix any physical damage, debris, loose plugs, crimps, etc. found on hardware. Still no internet? Keep trying other steps.
Use Starlink App to Check System
The Starlink mobile app (iOS or Android)has great built-in diagnostic tools, statistics, and troubleshooting features.
- Check obstruction map shows no red areas blocking dish view. Adjust position if needed until clear view established.
- See signal quality graphs over time. Weaker signal correlates to connectivity problems – insufficient satellites in range.
- Review router firmware version # to make sure up-to-date. If an update is available, the app will present it; otherwise updates install automatically.
- Check activity status – with no internet, app should show intermittent Searching or Offline messages you can use to diagnose.
- The app surfaces model-specific actions under Settings (for example, Reboot Starlink or Router > Factory Reset) to guide next steps.
While in app, also submit Support Ticket if problems persist detailing issue and troubleshooting already attempted.
Factory Reset Your Router
If you’ve tried all other basic steps with no resolution, resetting the router to factory conditions often helps. Use the correct method for your hardware model.
Note: Back up router settings first if customized! Resets wipe settings entirely!
To factory reset:
- Gen 3 and Router Mini: Use Settings > Router > Factory Reset in the app, or press the rear reset button until the LED blinks, then release. The router will reboot and you’ll reconfigure Wi‑Fi.
- Gen 2: With the router powered on, perform six power cycles by unplugging and re‑plugging the power at ~2–3 second intervals. After the sixth cycle, the router resets and reboots to defaults.
- Starlink Mini: Press and hold the rear reset until you feel the click; when the LED blinks and goes dark, release. The unit will restart and return to setup mode.
This refresh clears software faults or protocol issues. Reconfigure passwords, WiFi name, and any custom settings afterward.
Still having problems? May be hardware failure – contact Starlink Support.
Contact Starlink Support
If you still see your Starlink connected without providing any internet after trying all troubleshooting steps – it’s time to involve technical support.
- Open a Support Ticket in the Starlink app detailing the issue, steps attempted already, and your hardware setup.
- Use the Starlink support website for billing, equipment, or service requests.
- For connectivity outages where you cannot get online, phone support is available: US 1‑866‑606‑5103; Canada 1‑888‑864‑1321. The email listed in legal documents is for consumer complaint handling and not for real‑time troubleshooting.
- Support can run remote diagnostics, send replacement parts, or escalate issues found on production service.
- If dish/router ends up needing full replacement, they can arrange warranty service.
Support can run remote diagnostics, arrange replacements, and address account or equipment issues. They no longer refer to a beta period.
Tips for Improving Starlink’s Internet Connection
While going through the troubleshooting process, also consider these tips to optimize Starlink’s connectivity in general:
- Install Mesh WiFi system – If you still have dead spots, you might need a mesh WiFi system or a couple of WiFi extenders to get a good signal throughout your home. For wired backhaul, Gen 3 routers include two LAN ports; Gen 2 requires the Starlink Ethernet Adapter. See the latest picks here: Best WiFi Extenders for Starlink.
- Enable Quality of Service – Routers with QoS or “gaming mode” prioritize latency sensitive traffic like video streaming or voice calls. This can help stabilize performance.
- Change WiFi Channel – Simple router tweak if wireless experiencing interference from neighbors or devices in house.
- Use Wired Ethernet Connection – For stationary use, wired internet avoids issues that impact WiFi like signal obstruction or congestion.
- Adjust Dish Cable Bends – Solid core dish cable can degrade if bent excessively. Ensure smooth runs without kinks that impede internal wiring over time.
- Check for Obstructions Frequently – Use the obstruction tool in the app to ensure a clear view. Standard actuated kits self‑orient and do not require manual alignment.
- About Routing/PoP Selection – Routing through ground stations and points of presence is managed automatically by Starlink and cannot be changed on request. If a service routes you incorrectly, adjust that service’s location settings or use a reputable VPN as appropriate.
- Limit Use During Initial Network Training – Performance and reliability may vary for a short time after a fresh setup or reset. Allow the system to stabilize before heavy use.
- Install Updates Promptly – Keeping router and dish firmware updated ensures you have the latest features and fixes. Apply updates if the app presents them; otherwise, they install automatically.
Following those tips will generally offer you a faster, lower latency, and more reliable experience using Starlink anywhere safe to set it up!
Conclusion
Despite bringing high speed satellite internet to areas neglected by traditional ISPs, Starlink is still refining their technology with fluctuating connectivity issues at times.
Troubleshooting your Starlink connection when the app shows connected but provides no actual internet revolves around methodically checking for outages impacting service, reviewing dish placement, inspecting all hardware components for faults, proper router configuration, and factory resetting devices as necessary.
While frustrating when it goes offline unexpectedly, take the initiative to patiently go through solutions like rebooting the system, verifying cable integrity, confirming firmware is current, toggling router settings, and confirming no new dish obstructions. Also be sure to contact Starlink Support directly if problems endure despite best efforts.
As the constellation expands and stabilizes with thousands of active low Earth orbit satellites, the internet service provided by Starlink continues to improve in quality, availability and reliability. For now, occasional bumps may still need attention to maintain connectivity.
- Best WiFi 7 Mesh Systems (2026) — Tested & Ranked for Multi-Gig Homes - April 28, 2026
- Best Routers for Verizon FiOS (2026) — WiFi 7 & Mesh Picks Tested - April 13, 2026
- Best 2.5GbE Switches for Home Lab (2026) — Tested & Verified - April 8, 2026