In today’s digital age, a reliable and fast Wi‑Fi connection is essential for seamless internet access throughout your home. However, due to factors like the size of your living space, wall obstructions, or the location of your router, you may experience weak signals or dead zones in certain areas.
This is where a TP-Link range extender comes in handy. As a leading provider of networking solutions, TP-Link offers a variety of WiFi extenders to help you expand your wireless coverage. In this comprehensive guide, we’ll walk you through the process of TP-Link extender setup with the Tether app, tplinkrepeater.net, WPS, and AP Mode, and explain how EasyMesh enables single‑SSID roaming with compatible routers so you can enjoy a strong and stable internet connection in every corner of your home.
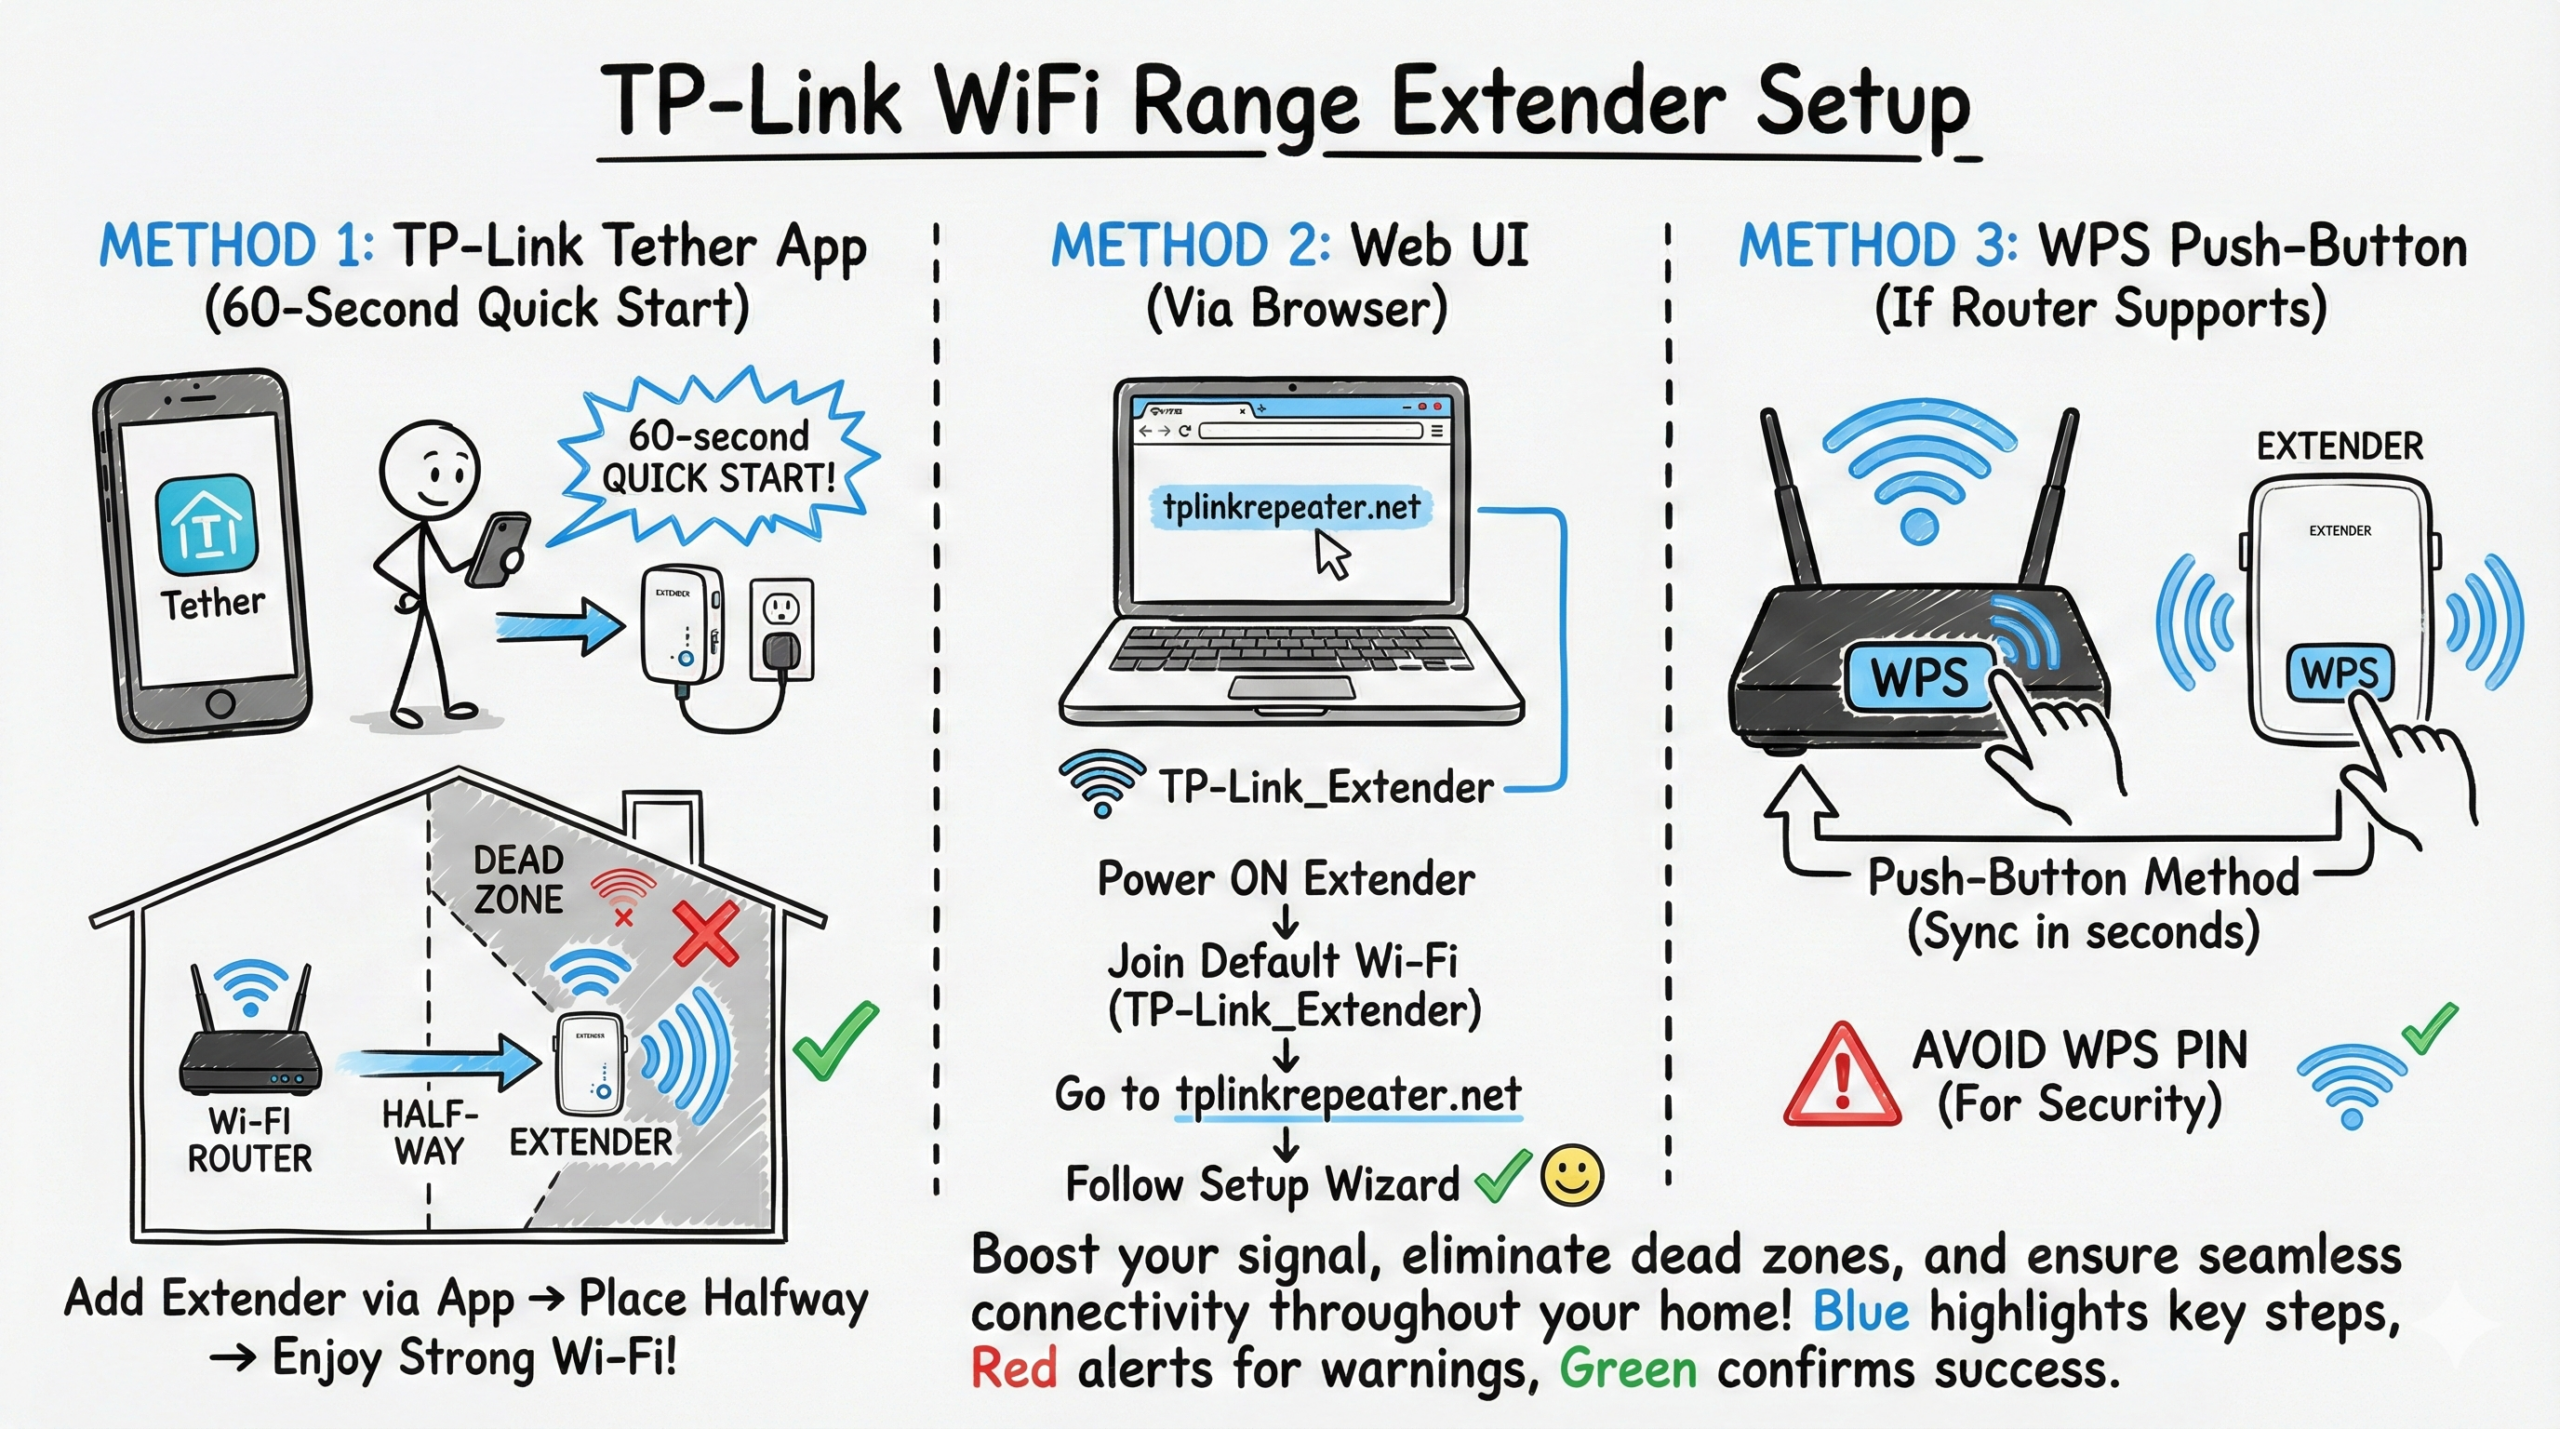
A 60‑second quick start
Use the TP‑Link Tether app to add your extender, then place it halfway between your router and the dead zone; if you prefer the web UI, power on the extender, join its default “TP‑Link_Extender” Wi‑Fi, go to tplinkrepeater.net, and follow the wizard; if your router supports WPS, you can use the push‑button method (avoid WPS PIN).
Understanding TP-Link Wi-Fi Range Extenders
Before diving into the setup process, let’s clarify what a Wi‑Fi extender is and how it works. A Wi‑Fi extender, also known as a range extender or repeater, is a device that picks up your existing Wi‑Fi signal, amplifies it, and then rebroadcasts the boosted signal to areas where the original signal is weak or nonexistent. This effectively extends the coverage of your wireless network, eliminating frustrating dead zones and allowing you to enjoy seamless connectivity throughout your home. With EasyMesh‑capable TP‑Link extenders and compatible routers, you can keep a single network name (SSID) for smoother roaming across your space.
TP-Link offers a wide range of Wi‑Fi extender models to suit various needs and budgets. Some popular options include the RE220, a compact and affordable dual‑band extender, and the more powerful RE550 (Wifi extender with Ethernet port). Also consider newer Wi‑Fi 6/6E/7 models such as RE700X/RE705X (Wi‑Fi 6), RE815XE (Wi‑Fi 6E), and the Wi‑Fi 7 RE‑BE series for higher throughput and better client capacity. Security support varies by model: for example, RE700X supports WPA3, while RE220/RE550 support WEP/WPA/WPA2. Regardless of the model you choose, a TP-Link range extender is an excellent solution for improving Wi‑Fi speed, extending your wifi to the detached garage, and eliminating connectivity issues in larger homes, multi‑story buildings, or spaces with thick walls that impede wireless signals.
Below are some of the best TP-Link WiFi extenders.


Preparing for TP-Link Extender Setup
Before you begin the TP-Link extender setup process, there are a few factors to consider and preparations to make:
- Router Compatibility: Ensure that your existing router is compatible with the TP-Link extender you’ve purchased. Most TP-Link extenders work with any router brand, but check two things: EasyMesh/OneMesh support for single‑SSID roaming and security support (WPA2 vs WPA3). If your router is set to WPA3‑only, make sure the extender supports WPA3 or use a mixed WPA2/WPA3 mode.
- Extender Placement: Consider the ideal location for your extender. It should be placed approximately halfway between your router and the area where you experience weak signals. Avoid placing the extender in enclosed spaces or near metal objects, as these can interfere with the signal. A solid blue/green link LED typically indicates a good location, while red suggests moving closer to the router.
- Gather Necessary Materials: Make sure you have your TP-Link extender, the power adapter, and an Ethernet cable (if needed for the wired setup method/AP Mode). Have your router’s Wi‑Fi network name (SSID) and password handy; most newer extenders will also prompt you to create a local admin password on first login.
- Update Router Firmware: To ensure optimal performance and compatibility, it’s recommended to update your router’s firmware to the latest version before setting up the extender. If you plan to use WPA3 or EasyMesh features, confirm that both router and extender firmware support them.
- Choose Setup Method: Decide whether you want to use the browser-based setup or the TP-Link Tether app for a more user‑friendly experience. The Tether app allows you to set up and manage your extender using your smartphone or tablet; the web UI is best for advanced tweaks; use WPS push‑button only if you need the fastest pairing and can disable WPS PIN on the router.
Step-by-Step TP-Link Extender Setup
Now that you’re prepared, let’s go through the step-by-step process of setting up your TP-Link extender:
- Connect to Power: Plug your TP-Link extender into a power outlet near your router. Wait for the LED lights to stabilize, indicating that the extender is ready for setup.
- Connect to Extender’s Wi‑Fi: Using your computer or mobile device, connect to the extender’s default Wi‑Fi network. Connect to the extender’s default SSID (often “TP‑Link_Extender” or band‑specific like “TP‑Link_Extender_2.4GHz/5GHz”).
- Access Web-Based Setup: Open a web browser and enter the extender’s management address. Go to tplinkrepeater.net. If that fails, try 192.168.0.254 when the extender is standalone; once it joins your router, check the router’s DHCP client list for the extender’s IP. On first login, most current models prompt you to create a local admin password; older models may use default credentials. If you see a browser privacy warning, it is typically due to a local self‑signed certificate.
- Configure Extender: Follow the on‑screen instructions to select your existing Wi‑Fi network and enter its password. The extender will then connect to your router and establish a connection.
- Set Up Extended Network: For seamless roaming (especially with EasyMesh), use the same SSID and password as your main network. If you need to troubleshoot or separate bands/devices, temporarily set a unique SSID and change it back later.
- Save and Reboot: Once you’ve completed the configuration, save your settings and wait for the extender to reboot. The LED lights should turn solid, indicating a successful connection.
Alternative Setup Methods
In addition to the standard web-based setup, TP-Link offers alternative methods to configure your extender:
- WPS (Wi‑Fi Protected Setup): If your router supports WPS, you can use this feature for a quick setup. Press the WPS button on your router, then press the WPS button on your extender within 2 minutes. For security, use the push‑button method and disable WPS PIN where possible.
- Ethernet Cable: You can also set up your extender using an Ethernet cable. Connect one end to your extender’s Ethernet port and the other end to your computer. Access the web-based setup page and follow the instructions to configure the extender. For the most stable wired link, use AP Mode via Ethernet; some EasyMesh devices may also support wired backhaul depending on model/firmware.
- TP-Link Tether App: Download the TP-Link Tether app on your smartphone or tablet. Connect your mobile device to the extender’s default Wi‑Fi network, then open the app. Follow the in‑app instructions to set up and manage your extender, including placement tips and LED guidance.
Optimizing WiFi Extender Performance
To get the most out of your TP-Link extender, consider the following tips:
- Ideal Placement: Position your extender in a central location between your router and the area with weak signals. Avoid placing it in enclosed spaces or near metal objects that can interfere with the signal.
- Adjust Settings: Access the extender’s web-based management page or use the Tether app to fine-tune settings such as the wireless channel, bandwidth mode, and transmission power for optimal performance. If your router supports band steering and EasyMesh, keep SSIDs unified for better roaming.
- Utilize Ethernet Port: If you have devices that require a wired connection, such as gaming consoles or smart TVs, you can use the extender’s Ethernet port to provide a stable, wired connection. AP Mode via Ethernet is ideal when you can run a cable.
- Enable Advanced Features: TP-Link extenders offer features like Access Control, which allows you to manage connected devices, and parental controls to restrict access to certain websites or set time limits for internet usage. Keep firmware up to date, and match your security settings (WPA2/WPA3) between router and extender.
Troubleshooting Common Issues
Despite the straightforward setup process, you may encounter some issues. Here are solutions to common problems:
- Extender Not Connecting to Router: Ensure that your extender is within range of your router and that you’ve entered the correct Wi‑Fi password during setup. If the issue persists, try resetting both the extender and the router. If your router is set to WPA3‑only and the extender doesn’t support WPA3, switch the router to WPA2/WPA3 mixed mode or use a WPA3‑capable extender.
- Slow Wi‑Fi Speed: If you’re experiencing slow speeds through the extender, try moving it closer to your router or to a more open area. You can also try changing the wireless channel in the extender’s settings to reduce interference from other devices. For heavy traffic, prefer Ethernet/AP Mode or an EasyMesh‑capable setup for better backhaul.
- Devices Not Connecting to Extended Network: Make sure that your devices are within range of the extender and that you’re using the correct extended network name (SSID) and password. In most cases, keep the same SSID/password as the main network for seamless roaming; for troubleshooting, temporarily use a unique SSID. If necessary, forget the network on your device and reconnect.
- LED Lights Indicating Problems: Refer to your extender’s manual for the meaning of different LED light patterns. As a quick guide: solid blue/green usually indicates a good link, solid red a poor link, and blinking often means pairing or booting. Adjust placement until you see the “good link” color for your model.
- Resetting the Extender: If you’re experiencing persistent issues, you may need to reset your extender to its factory defaults. Press and hold the reset button (usually located on the side or bottom of the device) for 5–10 seconds until the LED lights flash. If tplinkrepeater.net doesn’t load after reset, try 192.168.0.254 on a direct connection or check the router’s DHCP client list for the assigned IP.
TP-Link Extender vs. Mesh Wi-Fi Systems
While TP-Link extenders are an excellent solution for boosting Wi‑Fi signal and eliminating dead zones, they are not the only option. Mesh Wi‑Fi systems, such as TP-Link’s Deco line, offer an alternative approach to achieving seamless whole‑home coverage. Many TP‑Link extenders and routers also support EasyMesh, which delivers a single SSID and coordinated roaming when compatible devices are paired.
| Feature | TP-Link Extender | TP-Link Mesh Wi-Fi (Deco) |
|---|---|---|
| Setup | Easy to set up and configure | Requires more setup and configuration |
| Coverage | Extends existing Wi‑Fi signal to eliminate dead zones | Creates a single, unified network for seamless coverage |
| Scalability | Can use multiple extenders for larger homes | Easily scale coverage by adding more nodes |
| Performance | May experience some speed loss due to signal repeat | Optimizes performance by determining the best path for data transmission |
| Cost | Generally more affordable | More expensive than extenders |
Ultimately, the choice between an extender and a mesh system depends on your specific needs, budget, and the size and layout of your home. If you have a smaller home or just need to eliminate a few dead zones, a TP-Link extender like the RE220 or RE550 may be the most cost-effective solution. However, if you want higher throughput and seamless roaming, consider EasyMesh‑capable extenders with a compatible router, or step up to a mesh system like TP‑Link Deco.
Conclusion
Setting up a TP-Link extender is straightforward and can significantly improve your home Wi‑Fi experience. By following the steps outlined in this guide and considering factors like extender placement, security mode (WPA2/WPA3), and whether to mirror your SSID for roaming, you can extend Wi‑Fi range, eliminate dead zones, and enjoy seamless connectivity throughout your home.
Remember to consult your extender’s manual for specific instructions and troubleshooting tips, and don’t hesitate to reach out to TP-Link’s customer support if you encounter any issues. With a properly configured TP-Link extender, you can say goodbye to Wi‑Fi problems and hello to a stronger, more reliable internet connection.
FAQs
How do I know if I need a Wi‑Fi extender?
If you’re experiencing weak signals, slow speeds, or dead zones in certain areas of your home, a Wi‑Fi extender can help improve your coverage and connectivity. If you already own a TP‑Link router that supports EasyMesh, pairing it with an EasyMesh‑capable extender can deliver single‑SSID roaming.
Can I use a TP-Link extender with any router brand?
Yes, most TP-Link extenders are designed to work with any router brand. However, check compatibility for features like EasyMesh and security modes (WPA2/WPA3) before purchasing.
How many devices can connect to a TP-Link extender?
The number of devices that can connect to a TP-Link extender depends on the specific model. Most extenders can support multiple devices, but performance may be affected if too many devices are connected simultaneously. Wi‑Fi 6/6E/7 models generally handle more concurrent clients.
Can I use multiple TP-Link extenders in my home?
Yes, you can use multiple TP-Link extenders to further expand your Wi‑Fi coverage. Place them strategically to avoid signal interference and ensure optimal performance; for best results, use EasyMesh with a compatible router or wire extenders in AP Mode.
What should I do if my TP-Link extender is not working?
First, try resetting your extender and router. If the issue persists, check the LED lights for any error indications and refer to your extender’s manual for troubleshooting steps. Confirm security mode compatibility (WPA2/WPA3), and if tplinkrepeater.net doesn’t load, try 192.168.0.254 or look up the extender’s IP in your router’s DHCP list.
- pfSense 10G Home Lab Setup: Complete Hardware Guide (2026) - April 1, 2026
- Best Budget Home Lab Setup Under $300 (2026): Complete Starter Stack - March 30, 2026
- Best Modems for Spectrum: Top DOCSIS 3.1 Picks That Actually Work - March 28, 2026