A guest network is often an underutilized feature on your Home WiFi router. By setting up a guest network, you allow your visitors to access the internet without compromising the security of your primary WiFi network.
In this article, we’ll dive into the benefits of setting up a guest network and provide a step-by-step guide on how to configure one on your home WiFi router.
Key Takeaways
- Guest networks provide a secure way to share your internet connection with visitors without granting access to your primary network.
- Most modern routers support guest network functionality, and setting one up is a straightforward process.
- Use strong encryption (WPA2 or WPA3) and a unique password for your guest network to ensure security.
- Regularly update your router’s firmware and monitor connected devices to maintain the integrity of your guest network.
- Proper router placement and the use of Wi-Fi extenders or mesh systems can help optimize guest network performance.
Understanding Guest Wi-Fi Networks
A guest network is a separate wireless network that runs alongside your primary network. It allows visitors to connect to the internet without having access to your main network’s resources, such as shared files and printers. This separation adds an extra layer of security to your home network.
Advantages of Using a Guest Network
-
Enhanced security: By isolating your guests’ devices from your primary network, you reduce the risk of unauthorized access to your personal data and devices.
-
Simplified sharing: You can provide your guests with the guest network password without revealing your primary network credentials.
-
Bandwidth control: Many routers allow you to set bandwidth limitations for the guest network, ensuring that your primary network’s performance isn’t affected by guest usage.
-
IoT device segregation: You can connect smart home devices to the guest network, preventing potential security risks associated with these devices.
Common Misconceptions About Guest Networks
-
Myth: Guest networks are less secure than primary networks.
-
Fact: Guest networks can be just as secure as primary networks when properly configured with strong encryption and passwords.
-
-
Myth: Setting up a guest network is complicated and time-consuming.
-
Fact: Most modern routers have user-friendly interfaces that make setting up a guest network a breeze.
-
See also:
- USB Ports on Your Home Router
- MAC Address Filtering on Home Routers
- Dynamic DNS or DDNS on Home Routers
- Port Forwarding on Home Routers
- Mastering QoS Settings on Home Router
Preparing to Set Up a Guest Network
Before you begin configuring your guest network, ensure that your router supports this feature. Most modern routers from popular brands like Netgear, Linksys, ASUS, TP-Link, and D-Link offer guest network functionality.
Accessing Your Router’s Settings
-
Connect your computer or mobile device to your router’s network.
-
Open a web browser such as Chrome, Firefox, Safari, or Edge.
-
Enter your router’s IP address or default gateway in the address bar. This information can usually be found on the bottom of your router or in its manual.
-
Enter your router’s admin password to access the settings page. If you haven’t changed the password, refer to the manual for the default credentials.

Locating the Guest Network Settings
Once you’ve accessed your router’s settings, look for the guest network configuration options. These settings are typically found under sections like “Guest Network,” “Guest Access,” or “Wireless Settings.”
Step-by-Step Guide to Configuring a Guest Network
Follow these steps to set up a guest network on your home WiFi router:
-
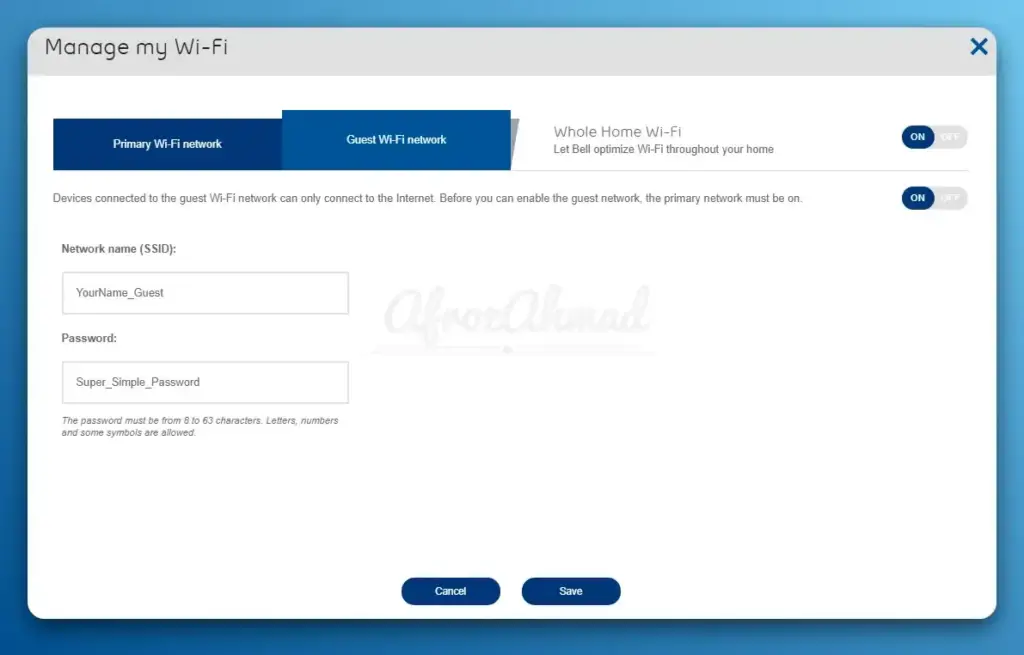
Enable the guest network feature: Look for an option to turn on the guest network and enable it.
-
Set a network name (SSID): Choose a name for your guest network that is different from your primary network’s name. This will help your guests identify the correct network to connect to.
-
Configure security settings: Select WPA2 or WPA3 encryption for the best security and set a strong password for your guest network.
-
Adjust access restrictions: Decide whether you want to allow guests to access your local network resources, such as printers or file shares. For enhanced security, it’s recommended to disable intranet access.
-
Set bandwidth limitations: Some routers allow you to set bandwidth limits for the guest network, ensuring that your primary network’s performance isn’t affected by guest usage.
-
Configure advanced settings: Depending on your router, you may have access to advanced settings like guest network validity period (how long the network remains active) and AP isolation (preventing guests from communicating with each other).
-
Save the settings and test: Once you’ve configured your guest network, save the settings and test the network by connecting a device to it. Verify that the device can access the internet but not your local network resources.
Best Practices for Securing and Managing a Guest Network
To ensure the security and smooth operation of your guest network, follow these best practices:
- Use a strong and unique password: Set a strong password for your guest network that is different from your primary network’s password. Regularly change the password to maintain security.
- Update your router’s firmware: Keep your router’s firmware up to date to ensure you have the latest security patches and performance improvements.
- Monitor connected devices: Regularly check the list of devices connected to your guest network and remove any unknown or suspicious devices.
- Educate your guests: Inform your guests about responsible network usage and the importance of not sharing the guest network password with others.
Troubleshooting Common Issues
If you encounter problems with your guest network, try these troubleshooting tips:
- Connectivity issues: Ensure that the guest network is enabled and that the password is correct. If the issue persists, try resetting the router.
- Slow network speeds: Check if there are too many devices connected to the guest network and consider setting bandwidth limitations. Also, ensure that the router is placed in a central location for optimal coverage.
- Compatibility problems: If a guest device is having trouble connecting to the network, verify that it supports the router’s wireless standards (e.g., 802.11ac) and encryption type (e.g., WPA2).
Optimizing Guest Network Performance
To ensure the best possible performance for your guest network, consider the following:
- Router placement: Place your router in a central location, away from obstacles like walls and metal objects, to ensure optimal wireless coverage.
- Use Wi-Fi extenders or mesh systems: If you have a large home or area to cover, consider using Wi-Fi extenders or mesh systems to eliminate dead zones and improve coverage.
- Adjust channel settings: If you experience interference from neighboring networks, try changing your router’s wireless channel to minimize overlap.
Conclusion
Setting up a guest network on your home WiFi router is a simple and effective way to provide internet access to visitors while maintaining the security of your primary network. By following the step-by-step guide and best practices outlined in this article, you can configure a guest network that is both secure and user-friendly.
Remember to regularly update your router’s firmware, monitor connected devices, and educate your guests about responsible network usage. If you encounter any issues, refer to the troubleshooting tips provided.
For more information on network security and router configuration, consult your router’s manual or visit the manufacturer’s website. With a properly configured guest network, you can enjoy peace of mind while providing your guests with a seamless internet experience.
- Telecom Network Infrastructure: Complete Guide to Components & Design - January 6, 2026
- TP-Link TL-SG108E vs Netgear GS308E: Budget Smart Switches - January 5, 2026
- MikroTik CRS305-1G-4S+ Review: The Ultimate Budget SFP+ Switch Guide - December 25, 2025


