Connecting an AT&T U-verse modem typically takes 30-45 minutes for experienced users and up to 2 hours for beginners.
This guide will walk you through the necessary steps to install, activate, troubleshoot, and maintain the AT&T U-verse modem, including optional router and VOIP integration for enhanced WiFi and phone capabilities as well. Let’s dig in.
Key Takeaways
- 🕒 Connecting an AT&T U-verse modem takes 30-45 minutes for experienced users and up to 2 hours for beginners.
- 🛠️ Essential items for connection include a compatible modem, DSL/phone cable, power adapter, ethernet cable, and AT&T account information.
- 🔌 Key ports on the modem include DSL (for the phone line), Ethernet (for wired device connections), and Power.
- 📅 Installation shouldn’t begin before the service activation date, especially important for homes with security or health alarm systems.
- 🚀 Step-by-step installation involves positioning the modem, connecting cables (DSL, power, ethernet), optional router and VoIP phone connections, powering on, and activating.
- 💡 To ensure a successful setup, the modem should be placed in a central, elevated location away from noise and clutter.
- 🌐 After setup, devices can connect over WiFi or wired connections; testing internet and U-verse services is recommended.
- 🛠 Troubleshooting tips cover no lights or internet connection, modem lights not turning green, slow Wi-Fi speeds, activation failures, and no wireless connectivity.
- 🔄 Maintenance advice includes updating modem firmware, rebooting regularly, and replacing modems older than 3-4 years for optimal performance.
- 📞 AT&T provides ongoing support through their website, mobile app, customer service phone numbers, chat support, and retail stores for equipment issues, billing, and troubleshooting.
What You Need Before Connecting Your AT&T U-verse Modem
In order to connect your AT&T U-verse modem, you’ll need a few key pieces of equipment:
- AT&T U-verse compatible modem – This connects directly to the DSL phone cable to communicate with AT&T’s network. Many modems are compatible, but AT&T provides a list of tested and approved modems they recommend.
- DSL / Phone cable – This special cable, mostly green in color, connects from your phone jack to the DSL port on the modem. It looks similar to an ethernet cable but is not interchangeable.
- Power adapter – Your AT&T modem will come with a power supply brick to plug into an outlet. This powers the modem itself during operation.
- Ethernet cable – You’ll need an ethernet cable to connect from your modem to your computer or router. Cat5e or Cat6 cables are recommended for best connectivity.
- AT&T Account information – Have your U-verse account number, phone number, and passcodes handy for activation.
- Other devices – You may also need additional routers, wireless receivers, HDMI cables, etc.
When it comes to ports that you’ll be working with, here’s a quick overview:
- DSL – The DSL or ADSL port is what connects directly to the phone line coming from your wall jack. This carries the internet signal.
- Ethernet – Ethernet ports allow devices to connect directly to your modem with a wired connection for faster and more reliable connectivity.
- Power – The power port connects to the standard power adapter to turn on your modem.
Pre-Installation Checks
- Verify the service activation date; do not install before 2 pm on the given date.
- Monitored home security or health alarm systems require professional installation by AT&T.
Now, let’s get to the step-by-step modem installation walkthrough.

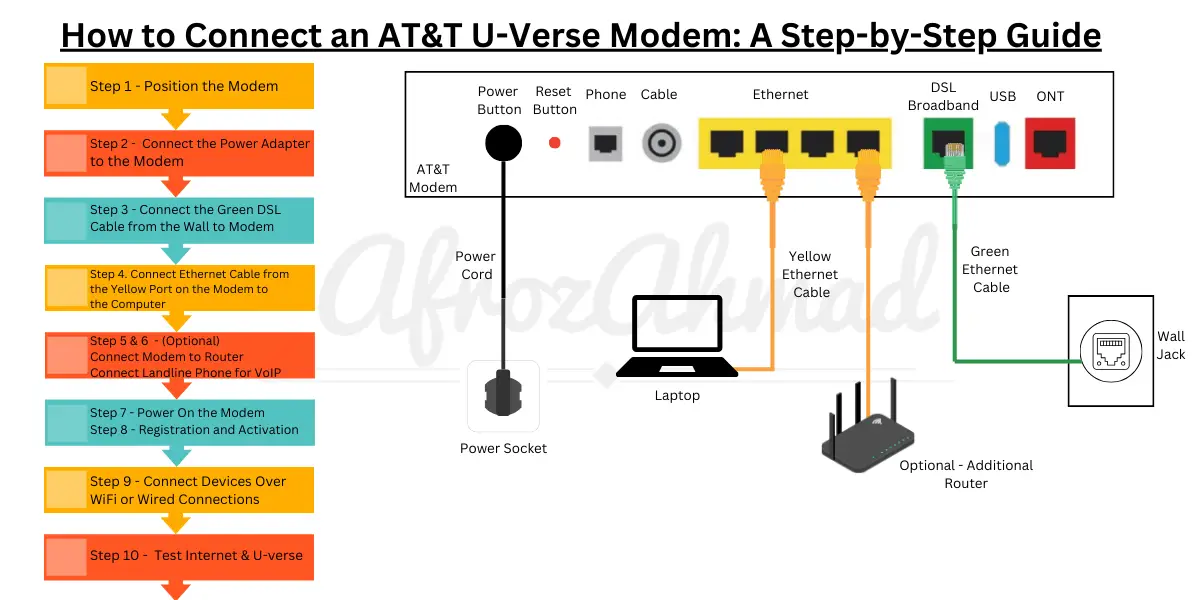
Step-by-Step Guide to Connecting Your AT&T Modem
Follow these steps to get your new AT&T modem hooked up properly:
- Step 1. Position the Modem
- Step 2. Connect the Green DSL Cable from the Wall to the Modem
- Step 3. Connect the Power Adapter to the Modem
- Step 4. Connect the Ethernet Cable from the Yellow port on the Modem to the Computer
- Step 5. Optional: Connect Modem to Your Router
- Step 6. Optional: Connect Landline Phone for VoIP
- Step 7. Power On Your AT&T U-verse Modem
- Step 8. Registration and Activation
- Step 9. Connect Devices Over WiFi or Wired Connections
- Step 10. Test Internet & U-verse
1. Position the Modem
Determine where you want to place your U-verse modem. Set it in a central area near power outlets and phone/Ethernet connections. Make sure:
- It’s elevated and has good airflow
- It’s free from noise, heat, dust or clutter
- The location is permanent
This helps maintain a strong, reliable signal. Run cables along walls if needed.
2. Connect the Green DSL Cable from the Wall to the Modem
The first step is connecting your phone line to the modem’s DSL port. Your AT&T U-verse connection will come out of your phone wall plate or jack, normally with a small cover plate. Unscrew this plate, and you’ll find a standard phone jack.
Plug one end of the provided Green DSL cable into this wall jack to secure the connections. Then, take the other end of the DSL cable and plug it firmly into the port labeled DSL or ADSL on your modem. Make sure the connections are snapped in securely.
3. Connect the Power Adapter to the Modem
Next, plug the provided power adapter into your AT&T modem’s power port, normally located on the back. Secure the connection fully. Then, plug the adapter into a nearby wall outlet or power strip.
At this point, don’t power on your modem just yet. We’ll come back to that shortly.
3. Connect Ethernet Cable from Modem to Computer
For this initial setup process, you’ll want to have your modem connected directly to a computer rather than routing through a wireless router first. This allows you to easily access the modem’s settings to activate your internet connectivity.
Connect one end of a Yellow ethernet cable to any of the yellow LAN ports on your modem. Then, connect the other end to your computer’s ethernet port, typically located on the motherboard.
4. Optional: Connect Modem to Your Router
As mentioned previously, many choose to connect their AT&T modems to a third-party wireless router for better WiFi range and performance.
If you want to incorporate your own router, connect your modem LAN port to your router’s WAN port using an ethernet cable. This bridges the internet connectivity between the devices.
Then, you can connect other wired devices to additional LAN ports on your router while connecting wireless devices to your router’s WiFi network.
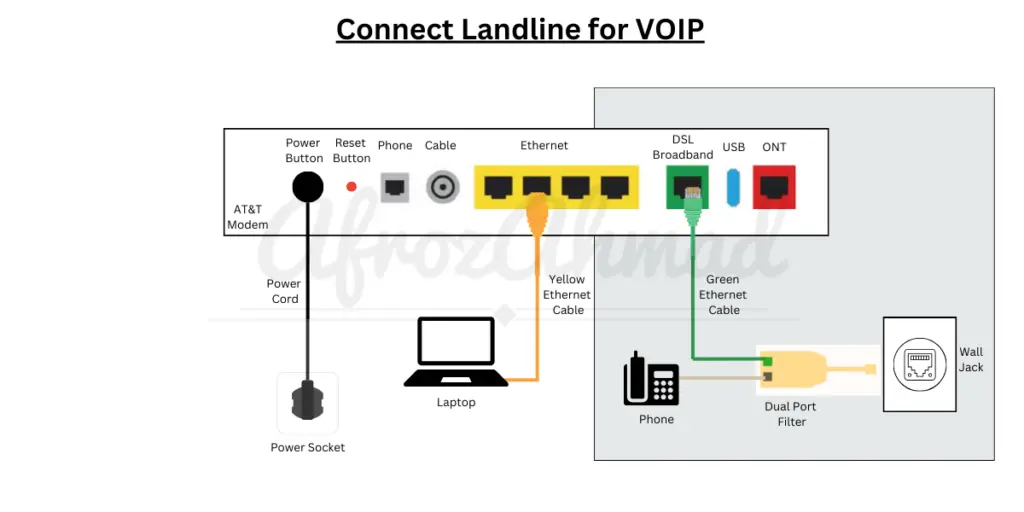
5. Optional: Connect Landline Phone for VoIP
Many AT&T internet plans come bundled with VoIP phone service. This means your home’s landline phone connects directly to the modem as well.
To set up a VoIP connection, simply attach the Dual Port Filter and connect a DSL cable to the DSL port. Then, connect the RJ11 cable to the phone port to transform it into a fully functional telephony modem.
Alternatively, locate the PHONE port on your modem. Take a standard phone cable with RJ-11 connectors and plug one end into the modem’s phone jack. Plug the other end into your landline phone handset wall jack to connect the hardware.
With VoIP connectivity, you can make and receive calls over AT&T’s network just like traditional phone service. Manage your account and voicemail settings directly through your AT&T account online.
Note: If you have cable internet rather than DSL, the setup process will look a bit different. Consult your cable provider for specifics on connecting and activating a cable modem.
6. Power On Your AT&T U-verse Modem
With all the cabling and hardware connections in place, go ahead and turn on your AT&T modem using the power switch or button. The power light should turn on immediately.
Next, watch for solid indicator lights:
- The broadband light indicates the internet
- The service light shows U-verse connectivity
Give your modem 5 minutes for lights to turn solid green. This means it’s communicating properly with the U-verse network. Avoid unplugging the green data cable during this process.
7. Registration and Activation (Approx. 5 minutes):
- For customers who completed online registration, activation is automatic.
- For those who haven’t registered online, Open a browser and enter att.com/uverse in the address bar.
You’ll need to enter:
- Your account number (available on order confirmation email)
- Home phone number (optional)
- 4-digit Passcode (You selected at the time of order)
Follow the activation steps shown on the screen. All your modem lights should shine green when done and you will see the success message “Congratulations. Your AT&T U-verse services are now activated and ready to use!“.
8. Connect Devices Over WiFi or Wired Connections
Once your modem is activated, wired devices plugged directly into the modem’s LAN ports will begin connecting to the internet automatically.
For wireless devices, locate the WiFi network name (SSID) and password printed on your modem or its documentation. Use this to connect your wireless phones, laptops, tablets and more.
If connected to a separate router, connect wirelessly there instead using the credentials provided in your router settings.
9. Test Internet & U-verse
Double-check your modem setup and test connectivity:
- Browse websites over Wi-Fi with no issues
- Stream U-verse TV on receivers
- Make VoIP calls with your landline
If you notice slow speeds, activation problems or can’t go online, see our troubleshooting section below.
U-verse Modem Setup Troubleshooting
Running into issues getting your AT&T modem up and running? Try these troubleshooting tips before contacting customer support:
No Lights or Internet Connection
If no indicator lights turn on, check power connections and electrical sources first. Next, firmly reseat cables, restart devices, or factory reset if needed. Wait the full 5 minutes before retrying activation.
Still, having issues? Contact U-verse support to verify all cabling and equipment or request a line check.
Modem Lights Won’t Turn Green
If indicator lights stay amber/orange or blinking, first retry activation on att.net/uverse. Double-check your wiring next, firmly reattaching all connectors. Inconsistent lighting could mean a connection problem.
Also, check for signal interference nearby, setting your modem further away from electronics. A line or service check may be needed if issues continue.
Slow Wi-Fi Speeds
If connected devices show slower-than-expected speeds, first try moving your modem away from obstructions and updating equipment.
Next, run internet speed tests – if speeds fall far short of your data plan, call support. They can investigate potential causes like connectivity problems, line issues, or modem malfunctions. Upgrades may resolve chronic slow speeds.
Activation Failures
Activation issues typically occur from using the wrong U-verse account details. First, double-check the credentials entered – account number, phone number, and passcode.
Also, call the activation line to confirm your modem MAC address is correct. Support can resend missing passcodes or guide the next troubleshooting steps.
No Wireless Connectivity
Can’t join or drops keep occurring? First, ensure devices have the current network name (SSID) and Wi-Fi password. Next reset network settings and reboot.
Check the modem interface to rule out the settings changes needed. Switch device positions to maintain a strong signal. Interference can disrupt wireless connectivity.
Tips for Smooth AT&T Modem Management
Once up and running, keep your AT&T gateway in tip-top shape with good connectivity hygiene. Follow these best practices for maintaining fast, reliable service:
- Update modem firmware for the latest features and security
- Reboot occasionally, at least once a month
- Enable automatic scans for threats
- Keep crowded devices 1-2 feet away
- Set each wireless device to use the optimal network band
- Add mesh units if Wi-Fi can’t reach certain areas
- Replace modems older than 3-4 years
Staying up to date while avoiding interference ensures your U-verse modem runs smoothly 24/7. Let visitors and guests know to respect your network, too!
Get Ongoing Support Managing Your AT&T U-verse Internet
AT&T offers plenty of helpful resources to guide U-verse subscribers every step of the way:
att.com & MyAT&T App
AT&T’s website and mobile app let customers manage accounts, learn self-help tips, pay bills seamlessly, and contact support in one spot. Access useful articles, how-to videos, setup wizards, and more tools around the clock.
A&T Customer Support Team
AT&T reps assist with order status, activations, equipment issues, and general questions by:
Phone:
- Wireless: 888-333-6651
- Internet: 800-288-2020
- Disability resources: TTY: 866-241-6567
- FirstNet: 800-574-7000
- International: +1.314.925.6925
Chat:
- You can access AT&T’s chat support through their website: https://www.att.com/support/contact-us/.
Website:
- You can manage your account, pay bills, and access support resources through AT&T’s website: https://www.att.com/my/
Additional Resources:
- AT&T Community Forums: https://forums.att.com/
- AT&T Help & Info: https://www.att.com/support/
Specialists troubleshoot problems, provide next steps, and schedule technician visits if wiring repairs become necessary.
Retail Stores
Visit AT&T stores in person for hands-on help picking up equipment, transfers, activations, and troubleshooting modem setup. Stores also offer entertainment options plus smart home and mobile solutions.
With all the above options, resolving U-verse modem problems is usually quick and straightforward. Reach out anytime issues emerge to restore fast connectivity.
In Summary…
Connecting and setting up an AT&T modem is quick and painless, following the steps above. In less than an hour you should be up and running with blazing fast internet speeds.
With automatic activation across their network, U-verse makes it easy to get your devices online. Experienced technicians can wrap up the entire process in under 30 minutes. Even first-timers can expect fast and working internet in about 1-2 hours from start to finish.
AT&T’s DSL and fiber internet plans allow any compatible modem, so finding an optimal device for your home is simple. Get your own modem today and save the monthly rental fee!
- pfSense 10G Home Lab Setup: Complete Hardware Guide (2026) - April 1, 2026
- Best Budget Home Lab Setup Under $300 (2026): Complete Starter Stack - March 30, 2026
- Best Modems for Spectrum: Top DOCSIS 3.1 Picks That Actually Work - March 28, 2026